Kia Sportage: Installing a CRS
After selecting a proper child seat for your child, check to make sure it fits properly in your vehicle.
Follow the instructions provided by the manufacturer when installing the child seat. Note these general steps when installing the seat to your vehicle:
- Properly secure the child restraint to the vehicle. All child restraints must be secured to the vehicle with the lap part of a lap/shoulder belt or with the LATCH system.
- Make sure the child restraint is firmly secured. After installing a child restraint to the vehicle, push and pull the seat forward and from side-toside to verify that it is securely attached to the seat. A child restraint secured with a seat belt should be installed as firmly as possible. However, some side-to-side movement can be expected.
- Secure the child in the child restraint. Make sure the child is properly strapped in the child restraint according to the manufacturer instructions.
Lower Anchors and Tether for Children (LATCH) system
The LATCH system holds a child restraint during driving and in an accident.
This system is designed to make installation of the child restraint easier and reduce the possibility of improperly installing your child restraint. The LATCH system uses anchors in the vehicle and attachments on the child restraint. The LATCH system eliminates the need to use seat belts to secure the child restraint to the rear seats.
Lower anchors are metal bars built into the vehicle. There are two lower anchors for each LATCH seating position that will accommodate a child restraint with lower attachments.
To use the LATCH system in your vehicle, you must have a child restraint with LATCH attachments.
The child seat manufacturer will provide you with instructions on how to use the child seat with its attachments for the LATCH lower anchors.
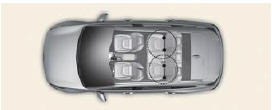 LATCH anchors have been provided
in
the left and right outboard rear seating
positions. Their locations are shown in
the illustration. There are no LATCH
anchors provided for the center rear
seating position.
LATCH anchors have been provided
in
the left and right outboard rear seating
positions. Their locations are shown in
the illustration. There are no LATCH
anchors provided for the center rear
seating position.
WARNING
LATCH Lower Anchors
Never attempt to attach a LATCH equipped seat in the center seating position.
LATCH lower anchors are only to be used in the left and right rear outboard seating positions. You may damage the anchors or the anchors may fail and break in a collision if the seat is in the center seating position.
The lower anchor position indicator symbols are located on the left and right rear seatbacks to identify the position of the lower anchors in your vehicle (see arrows in illustration).
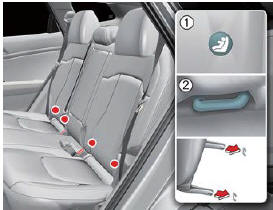
- Lower Anchor position indicator
- Lower Anchor
The LATCH anchors are located between the seatback and the seat cushion of the rear seat left and right outboard seating positions.
To use the lower anchor, push the upper portion of the lower anchor cover.
- Lower Anchor position indicator
- Lower Anchor
The LATCH anchors are located between the seatback and the seat cushion of the rear seat left and right outboard seating positions.
To use the lower anchor, push the upper portion of the lower anchor cover.
READ NEXT:
 Securing a child restraint with the
LATCH anchors system
Securing a child restraint with the
LATCH anchors system
To install a LATCH-compatible child
restraint in either of the rear outboard
seating positions:
Move the seat belt buckle away from
the lower anchors. Otherwise, the
webbing or buckle can be
Securing a child restraint with a
lap/shoulder belt
When not using the LATCH system, all
child restraints must be secured to a
vehicle rear seat with the lap part of a
lap/shoulder belt.
Automatic locking mode
All passenger seat belts move
freel
SEE MORE:
Muffler
Components and Components
Location
Components
Front muffler
Catalytic converter
Center muffler
Main muffler
Gasket
Repair procedures
Removal and Installation
1. Remove the front muffler (A).
Tightening torque:
39.2 ~ 58.8 N.m (4.0 ~ 6.0 kgf.m, 28.9 ~ 43.4 lb-ft)
2. Re
Vehicle lift (2-Support type) and safety stand positions
1. Place the lift blocks under the support points as shown in the
illustration.
2. Raise the hoist a few inches and rock the vehicle to be sure it is firmly
supported.
3. Raise the hoist to full height to inspect the lift points for secure support.
Jack and safety stand positions
Towin
Content
- Home
- Kia Sportage - Fifth generation (NQ5) - (2022-2026) - Owner's Manual
- Kia Sportage - Second generation (JEKM) (2005-2015) - Body Workshop Manual
- Kia Sportage Third generation (SL) - (2011-2016) - Service and Repair Manual
- Sitemap
- Top articles
