Kia Sportage: Fuel Filler Cap | Fuel Tank Air Filter
Description and Operation
Description
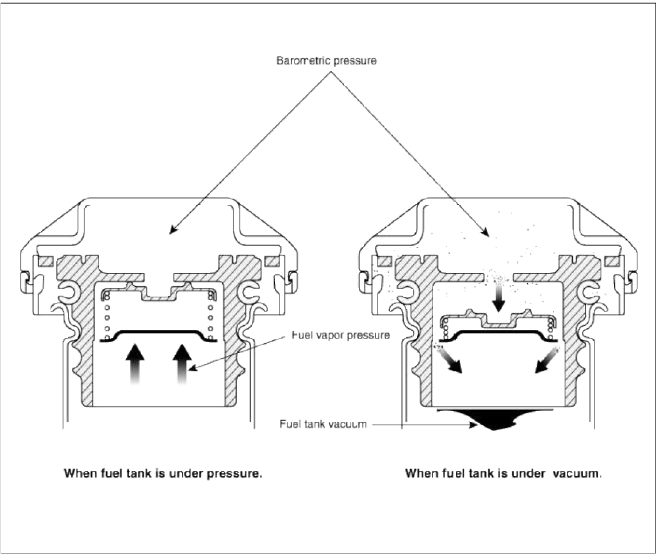
A ratchet tightening device on the threaded fuel filler cap reduces the chances of incorrect installation, which seals the fuel filler. After the gasket on the fuel filler cap and the filler neck flange contact each other, the ratchet produces a loud clicking noise indicating the seal has been set.
Fuel Tank Air Filter
Repair procedures
Removal
1. Turn the ignition switch OFF and disconnect the battery negative (-) cable.
2. Lift the vehicle with a jack.
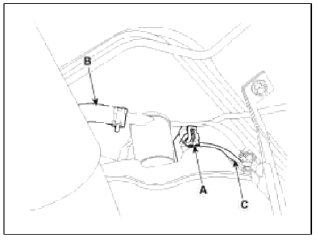
3. Disconnect the canister close valve connector (A).
4. Disconnect the ventilation hose (B) and vapor hose (C).
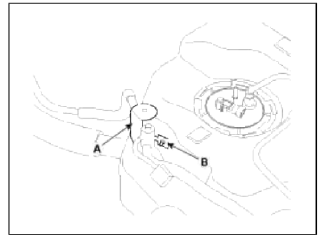
5. Remove the fuel tank air filter and canister close valve assembly (A) after removing the installation nut (B).
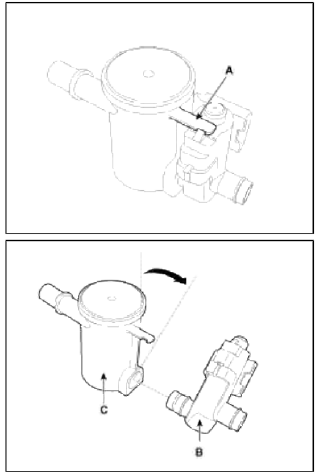
6. Release the lever (A), and then separate the canister close valve (B) from the fuel tank air filter (C) after rotating it in the direction of the arrow in the figure.
7. Install a new fuel tank air filter in accordance with the reverse order.
Installation
Installation is the reverse of removal.
Fuel tank air filter bracket installation nut: 4.8 ~ 5.2 N.m (0.5 ~ 0.53 kgf.m, 3.54 ~ 3.84 1b-ft)
READ NEXT:
 Description and Operation | Catalytic Converter | CVVT (Continuously Variable Valve Timing) System
Description
Exhaust emissions (CO, HC, NOx) are controlled by a combination of engine modifications and the addition of special control components.
Modifications to the combustion chamber, in
SEE MORE:
Luggage room lamp
: The lamp will always turn
on
when the liftgate is opened/closed.
: The lamp is on when the
liftgate
is opened, and off when the liftgate is
closed.
: The lamp will always turn
off
when the liftgate is opened/closed.
The luggage room lamp comes on when
the liftgate i
Occupant Detection System (ODS)
Your vehicle is equipped with an Occupant
Detection System (ODS) in the front
passenger's seat.
The ODS is
designed to detect the presence
of a properly-seated front passenger
and determine if the passenger's
front air bag should be enabled (may
inflate) or not. Only the front pass
Content
- Home
- Kia Sportage - Fifth generation (NQ5) - (2022-2026) - Owner's Manual
- Kia Sportage - Second generation (JEKM) (2005-2015) - Body Workshop Manual
- Kia Sportage Third generation (SL) - (2011-2016) - Service and Repair Manual
- Sitemap
- Top articles
