Kia Sportage: Rain Sensor
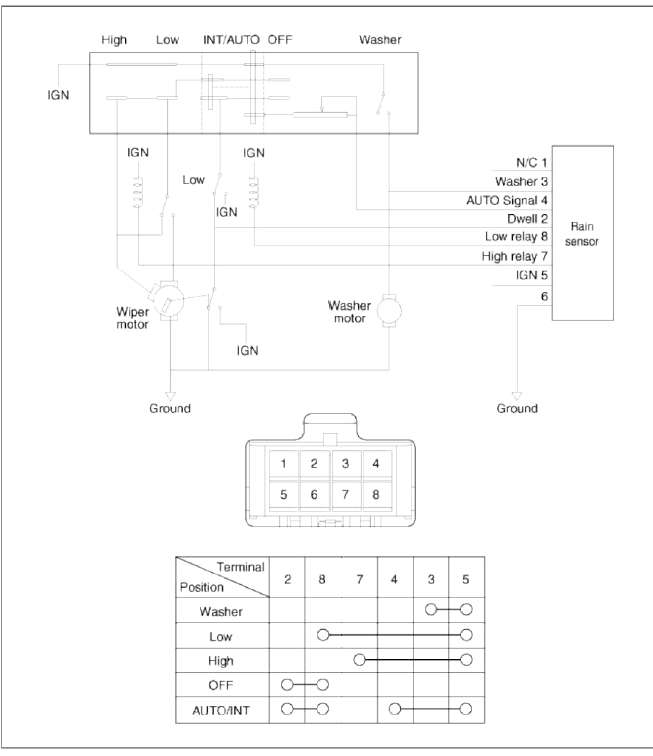
Schematic Diagrams
Circuit Diagram
Description and Operation
Description
The Rain sensing windshield wiper system is a wiper system that, in addition to providing normal wiper functions off, mist, manual low speed, manual high speed, and wash, provides automatic control of automatic intermittent automatic low, and automatic high speeds.
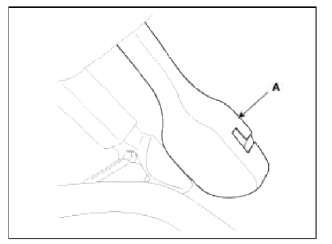
When the ignition key is in the ON position, the rain sensor (A) will be activated.
System Function
Basic Principle
Emitted Beam from luminosity diode is reflected entirely against the windshield exterior, and then turn into photo diode.
If there is water on the windshield exterior, beam separates optically, and the degree of remained beam is measured in the photo diode.
What there is water in the windshield, it means beam is not reflected all, so the degree of lost beam indicates the degree of glass surface wet.
NOTE
Rain sensor consist of two luminosity diode, two photo diode, optic fiber and coupling pad.
Operation Control
Wiper ECU transmits the signal as a rain sensor, and then the rain sensor perceives the rainwater to transmit to the wiping order wiper ECU, wiper ECU controls the wiper motor according to the signal.
Contact Influence
The rain sensor can malfunction due to following condition
- Contamination of the measurement surface.
- Air bubbles between the windshield and the coupling pad contact surface.
- The movement of coupling pad by vibration.
- Damaged wiper blade
Operation Condition
In case that engine stalls under wiper switch AUTO, rain sensor activates after once wiper operation to inform the driver that the system is under AUTO.
NOTE
In case that the rain sensor doesn't work or malfunction, it is needed manual wiper switch operation by the driver.
Repair procedures
Inspection
Rain Sensing Wiper
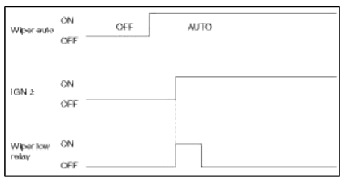
1. In IGN2 ON state, if auto switch input (LIN communication) is ON then both wiper low relay and wiper high relay outputs are controlled by the rain sensor input signal.
2. If the wiper switch has been left in automatic mode with the vehicle ignition OFF, and then the vehicle ignition switch is turned on, a single wipe will be performed.
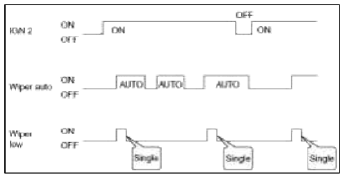
3. A single wipe will be performed whenever rain has been detected (Rain Detected signal from Rain sensor) and the wiper switch is moved to the AUTO position. But a single wipe will not be performed when the wiper switch is moved to the AUTO position and OFF signal is being received from Rain sensor. But if the wiper switch is moved to AUTO position for the first time since vehicle ignition switch is turned on then a single wipe will be performed regardless of Rain Detected or OFF signal.
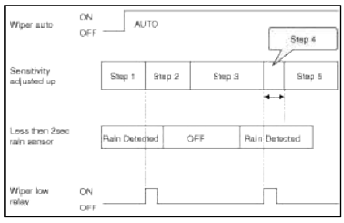
4. The drive may adjust the rain sensor performance by adjusting the sensitivity input. When in automatic mode, the BCM will perform a single wipe each time the sensitivity is adjusted upward to a more sensitive setting (downward more then one step). This single wipe will only be performed if Rain Detected signal is being received from the Rain sensor. If the sensitivity adjustment is adjusted upward more than one sensitivity, the BCM will only perform a single wipe unless the time between Increases is more than 2 seconds.
5. Fault strategy for the rain sensor
Rain Sensor Fault 1 - Internal Fault Detected
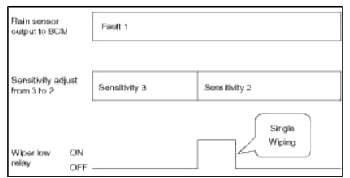
This failure is detected when the wiper is in automatic mode and the input faulty rain sensor from the rain sensor has a duty cycle corresponding to Fault 1. The confirmation delay for the failure is of 1 sec.
When this failure is detected, the wiper outputs are OFF and the wiper will also do a wipe in slow speed on the transition from sensitivity 3 to sensitivity 2 (Step 2 to 3) in order to signal the presence of this fault. If another sensitivity is set, the wiper won't make any additional wipe.
Rain Sensor Fault 2 - Glass Attachment Fault Detected
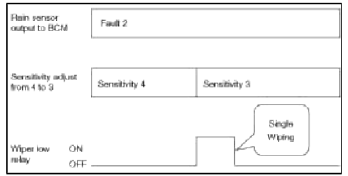
This failure is detected when the wiper is in automatic mode and the input faulty rain sensor from the rain sensor has a duty cycle corresponding to Fault 2. The confirmation delay for the failure is of 1s.
When this failure is detected, the wiper outputs are OFF and the wiper will also do a wipe on the transition from sensitivity 4 to sensitivity 3 (Step 1 to 2) in order to signal the presence of this fault. If another sensitivity is set, the wiper won't make any additional wipe.
Rain Sensor Fault 3 - No Input Signal Present
This failure is detected when the wiper is in automatic mode and the input faulty rain sensor from the rain sensor has a duty cycle corresponding to Fault 3 or in case the duty cycle of the input faulty rain sensor is 0% or 100%.
The confirmation delay for the failure is of 1s.
When this failure is detected, the wiper outputs are OFF.
Removal
CAUTION
The rain sensor may not operate properly if contaminated. Protect the rain sensor surface by not removing the cover until installation time. The coupling pad on the rain sensor surface has adhesive strength. Take care when installing the sensor. If the sensor is separated from the windshield by force, the sensor or windshield may be damaged. Take care when removing the sensor.
1. Remove the rain sensor cover (A) first.
Be careful not to damage the cover latch by applying excessive force. To remove the latch, pull aside the latch using the cover hole (B) with the little (-) screwdriver (C).
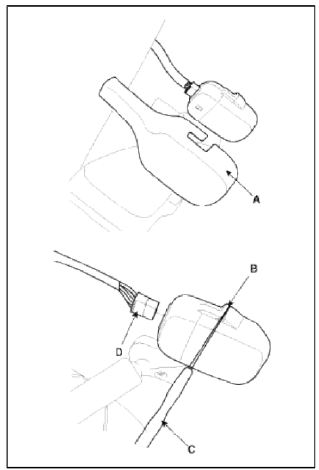
2. Remove the wiring harness connector (D) from sensor.
3. Rain sensor module is attached to the front windshield by glue replacing the front windshield, remove the rain sensor module from the existing front windshield and install on the new front windshield.
Installation
NOTE
- In case of the windshield with reflection layer which reflects the infrared rays in sensing field, remove the reflection layer from the rain sensor mounting position prior to installation.
- Avoid contamination of the sensor during installation.
1. Install the rain sensor bracket to the windshield glass using the tape.
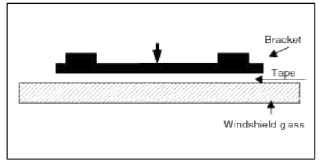
CAUTION
It is very important that the coupling pad pushes against the windshield completely to prevent bubbles from forming at the contact surface.
2. Connect the rain sensor connector, and then install the sensor cover.
READ NEXT:
 Components and Components Location | Rear Wiper Motor
Component Location
Rear wiper motor assembly
Head cap
Rear wiper motor mounting bolt
Rear wiper motor mounting hole
Pad cap
Hexagonal nut
Cover
Rear
SEE MORE:
Radiator support panel
Radiator support panel complete
Fender apron panel
Fender apron panel assembly
Front side outer member assembly
Cowl & Dash panel
Cowl panel complete
Cowl side outer panel
Dash panel complete
Side body panel
Front inner pillar assembly
Quarter inner panel
Fuel requirements
Your new vehicle is designed to use only
unleaded fuel having a pump octane
number ((R+M)/2) of 87 (Research
Octane Number 91) or higher. (Do not
use methanol blended fuels.)
Your new vehicle is designed to obtain
maximum performance with UNLEADED
FUEL, as well as minimize exhaust emissions
Content
- Home
- Kia Sportage - Fifth generation (NQ5) - (2022-2026) - Owner's Manual
- Kia Sportage - Second generation (JEKM) (2005-2015) - Body Workshop Manual
- Kia Sportage Third generation (SL) - (2011-2016) - Service and Repair Manual
- Sitemap
- Top articles
