Kia Sportage: Rear wiper blade replacement
Kia Sportage - Fifth generation (NQ5) - (2022-2026) - Owner's Manual / Maintenance / Wiper blades / Rear wiper blade replacement
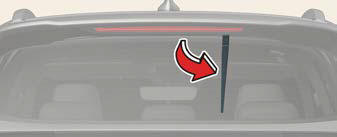
- Within 20 seconds after the vehicle ignition is OFF, move the wiper lever to MIST position for over 2 seconds until the wiper moves down to the bottom middle part.
- Raise the wiper arm and pull out the wiper blade assembly.
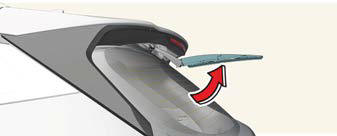
- Lift up the wiper blade, and pull the blade to remove it.
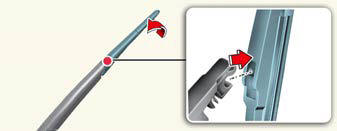
- Install the new blade assembly by inserting the center part into the slot in the wiper arm until it clicks into place.

- Make sure the blade assembly is
installed firmly by trying to pull it
slightly.
If the replacement is complete, put down the wiper arm to place it on the rear windshield, and turn the vehicle ignition to ON and operate the wipers to check the blade is installed correctly.
To prevent damage to the wiper arms or other components, have the wiper blade replaced by an authorized Kia dealer.
CAUTION
If the wiper arm receives too much force while pulling the blade, the center part may be damaged.
CAUTION
- The wiper could not operate for approx. 10 seconds when the wiper is operated without washer fluid or the blades are frozen. This is not a malfunction, it is a wiper protection system activated by motor overload circuit within the wiper motor.
- The front windshield should be cleaned with water hose and wiped with clean towel with wiper blades raised up. Also, the wiper blades should be wiped clean when the grease or wax is applied to the blades.
READ NEXT:
 For best battery service
Keep the battery securely mounted.
Keep the battery top clean and dry.
Keep the terminals and connections
clean, tight, and coated with petroleum
jelly or terminal grease.
Rinse any s
Battery recharging
Your vehicle has a maintenance-free,
calcium-based battery.
If the battery becomes discharged in a
short time (because, for example, the
headlamps or interior lights were left
on while the
SEE MORE:
Child-protector rear door lock
The child safety lock is provided to help
prevent children from accidentally opening
the rear doors from inside the vehicle.
The rear door safety locks should be
used whenever children are in the vehicle.
The child safety lock is located on the
edge of each rear door. When the child
saf
Turbo Charger
Components and
Components Location
Components
Turbine housing
Turbine inlet
Turbine outlet
Compressor housing
Compressor inlet
Compressor outlet
Center housing
EWGA (Electric Waste Gate Actuator)
Actuator rod
Repair procedures
On-vehicle Inspection
Turbocharg
Content
- Home
- Kia Sportage - Fifth generation (NQ5) - (2022-2026) - Owner's Manual
- Kia Sportage - Second generation (JEKM) (2005-2015) - Body Workshop Manual
- Kia Sportage Third generation (SL) - (2011-2016) - Service and Repair Manual
- Sitemap
- Top articles
