Kia Sportage: Rheostat | Front Fog Lamps | License Lamps
Repair procedures
Inspection
1. Disconnect the negative (-) battery terminal.
2. Remove the crash pad lower panel.
(Refer to the BD group - "Crash pad")
3. Remove the crash pad side switch assembly (A) after loosening 2 screws.
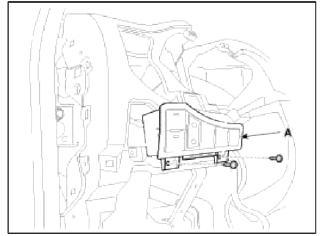
NOTE
Put on gloves to protect your hands.
4. Remove the side crash pad switch after disconnecting the connectors (A).
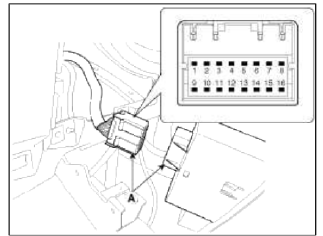
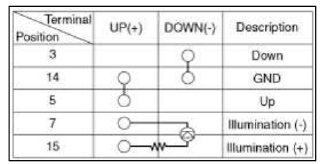
5. Operate the switch and check for continuity between terminals with an ohmmeter.
Front Fog Lamps
Repair procedures
Inspection
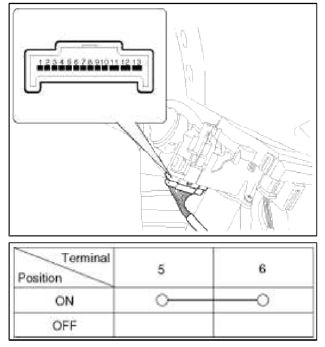
Front Fog Lamp Switch
1. With the fog lamp switch in each position, make sure that continuity exists between the terminals below. If continuity is not as specified, replace the multifunction switch.
Removal
1. Disconnect the negative (-) battery terminal.
2. Remove the front bumper.
(Refer to the BD group - "Front bumper")
3. Remove the front fog lamp (A) by turning in the counterclockwise direction after disconnecting the connector.
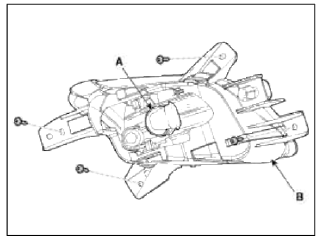
4. Remove the front fog lamp (B) after loosening the screws.
Installation
1. Install the front fog lamp bulb.
2. Connect the front fog lamp connector.
3. Install the front bumper.
License Lamps
Repair procedures
Removal
1. Disconnect the negative (-) battery terminal.
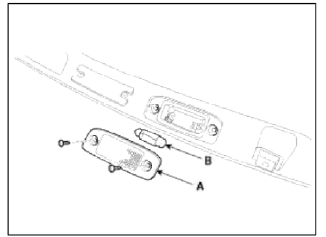
2. Remove the lens (A) and license lamp (B) after loosening 2 screws.
Installation
1. Install the bulb.
2. Install the license lamp lens.
READ NEXT:
 High Mounted stop lamp | Luggage Room Lamp | Rear combination lamp
Repair procedures
Removal
High Mounted Stop Lamp
1. Disconnect the negative (-) battery terminal.
2. Remove the tailgate trim.
(Refer to the BD group - "Tailgate")
3. Remove the spoile
SEE MORE:
Driver Attention Warning operation
Basic function
The basic functions of Driver Attention
Warning include:
Attention Level
Consider taking a break
Attention level
Function off
Driver Attention Warning
System Off
Standby/Disabled
Driver Attention Warning
Standby
Last Break
Attentive driving
Defogging logic
To reduce the possibility of fogging up
the inside of the windshield, the air
intake or air conditioning is controlled
automatically according to certain conditions
such as
or
position.
To cancel automatic defogging logic or
return to the automatic defogging logic,
do the followi
Content
- Home
- Kia Sportage - Fifth generation (NQ5) - (2022-2026) - Owner's Manual
- Kia Sportage - Second generation (JEKM) (2005-2015) - Body Workshop Manual
- Kia Sportage Third generation (SL) - (2011-2016) - Service and Repair Manual
- Sitemap
- Top articles
