Kia Sportage: Active air flap
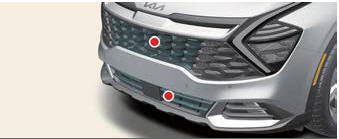
Active air flap system controls the air flap below the front bumper to cool the vehicle parts and improve energy efficiency.
Active air flap malfunction

- Check Active Air Flap System
The active air flap system may not operate normally if the air flap is temporarily opened due to foreign factors or if the controller is contaminated by snow or rain, etc.
When the message is popped up on the display, stop the vehicle in a safe place and check the status of the air flap.
Start the vehicle after performing the necessary work like foreign matter removal and waiting 10 minutes. If the pop-up remains up, have the vehicle inspected by an authorized Kia dealer.
CAUTION
- Regardless of the pop-up, if the air flaps aren't in the same position, stop the vehicle and wait for 10 minutes and start the vehicle and inspect the air flap.
- The active air flap system is actuated by motors. Do not disturb actuation or apply force excessively. It may cause failure.
NOTICE
Active air flap system could be activate regardless of the vehicle condition.( Parking, driving, charging, etc.)
READ NEXT:
 Good braking practices
 help keep occupants
safe and extend brake life.
Check to be sure the parking brake is
not engaged and the parking brake
indicator light is out before driving
away.
Vehicle Auto Shut-off system
If your vehicle is parked and the engine
is left on for a long period of time, the
engine will turn off automatically to help
reduce fuel consumption and prevent
accidents caused by carbon dioxide
SEE MORE:
Luggage net holder
To keep items from shifting in the cargo
area, you can use the 4 holders located
in the cargo area to attach the luggage
net (if equipped), or you can fold the
luggage net into half and attach it
upwards by using the additional 2 holders
located on each side.
If necessary, contact an auth
Installation - Repair procedures
Installation
Parking Brake Shoe [2WD]
1. Install the brake shoe.
2. Fix the brake shoe with shoe hold clip and then install the bolt (A).
Tightening torque:
2.0 ~ 4.9 N.m (0.2 ~ 0.5 kgf.m, 1.4 ~ 3.6 lb-ft)
3. Install parking brake assembly and hub assembly.
4. Install the parking brake cabl
Content
- Home
- Kia Sportage - Fifth generation (NQ5) - (2022-2026) - Owner's Manual
- Kia Sportage - Second generation (JEKM) (2005-2015) - Body Workshop Manual
- Kia Sportage Third generation (SL) - (2011-2016) - Service and Repair Manual
- Sitemap
- Top articles
