Kia Sportage: Adjustment - Repair procedures
Adjustment
Parking Brake Shoe Clearance Adjustment [2WD]
1. Raise the vehicle, and make sure it is securely supported.
2. Remove the rear tire and wheel.
3. Remove the plug from the disc.
4. Rotate the toothed wheel of adjuster by a screw driver until the disc is not moving, and then return it by 3 notches in the opposite direction.
No drag force of disc and must be confirmed occurrence of drag force of disc.
5. Install the rear wheel & tire after installing the plug on the disc.
Parking Brake Shoe Clearance Adjustment [4WD]
1. Raise the vehicle, and make sure it is securely supported.
2. Remove the rear tire and wheel.
3. Remove the plug (A) from the disc.
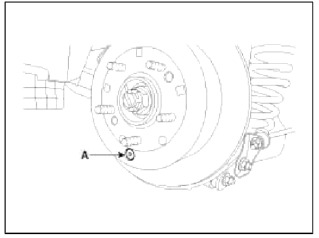
4. Rotate the toothed wheel of adjuster by a screw driver until the disc is not moving, and then return it by 3 notches in the opposite direction.
No drag force of disc and must be confirmed occurrence of drag force of disc.
5. Install the rear wheel & tire after installing the plug on the disc.
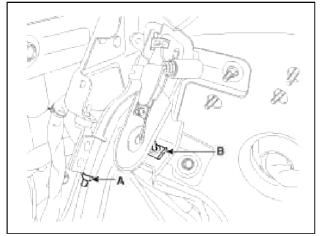
Parking Brake Pedal Stroke Adjustment
1. Operate the parking brake pedal though a full stroke over 3 times for setting the parking cables.
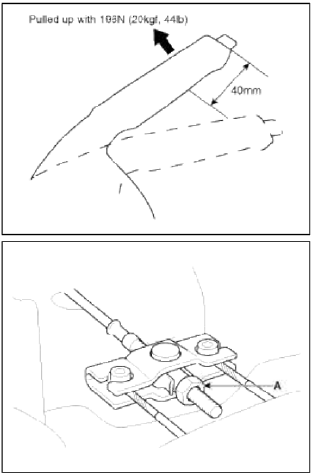
2. Adjust the adjusting nut (A) for parking brake pedal stoke 4 notches when operating effort is 196N (20kgf. 441bf).
CAUTION
1. The parking brake adjustment must be carried out after adjusting the rear shoe.
2. After adjusting parking brake, notice following matter.
- Must be free from clearance between adjusting nut and pin.
- Check securely that the brake is not dragging.
Parking Brake Lever Stroke Adjustment
1. Raise the vehicle, and make sure it is securely supported.
2. Remove the floor console rear cover.
3. Adjust the parking brake lever stroke by turning adjusting nut (A).
Parking brake lever stroke : 6 cliks (Pull the lever with 20kgf)
NOTE
After repairing the parking brake shoe, adjust the brake shoe clearance, and then adjust the parking brake lever stroke. (Refer to "Parking brake shoe installation")
4. Release the parking brake lever fully, and check that parking brakes do not drag when the rear wheels are turned. Readjust if necessary.
5. Make sure that the parking brakes are fully applied when the parking brake lever is pulled up fully.
6. Install the floor console rear cover.
READ NEXT:
 Components and Components Location | Description and Operation
Components
HECU module
Front wheel speed sensor
Rear wheel speed sensor
Yaw rate & Lateral & Longitudinal G sensor
Steering angle sensor
ABS Warning la
SEE MORE:
Curtain air bag
Curtain air bags are located along both
sides of the roof rails above the front
and rear doors.
* The actual air bags in the vehicle may
differ from the illustration.
They are designed to help protect occupants
in certain side impacts and to help
prevent them from ejecting out of the
veh
Thermostat
Repair procedures
Removal and Installation
NOTE
Disassembly of the thermostat would have an adverse effect, causing a
lowering of cooling efficiency. Do not
remove the thermostat, even if the engine tends to overheat.
1. Drain engine coolant so its level is below thermostat.
2. Disconnect
Content
- Home
- Kia Sportage - Fifth generation (NQ5) - (2022-2026) - Owner's Manual
- Kia Sportage - Second generation (JEKM) (2005-2015) - Body Workshop Manual
- Kia Sportage Third generation (SL) - (2011-2016) - Service and Repair Manual
- Sitemap
- Top articles
