Kia Sportage: Water pump
Components and Components Location
Components
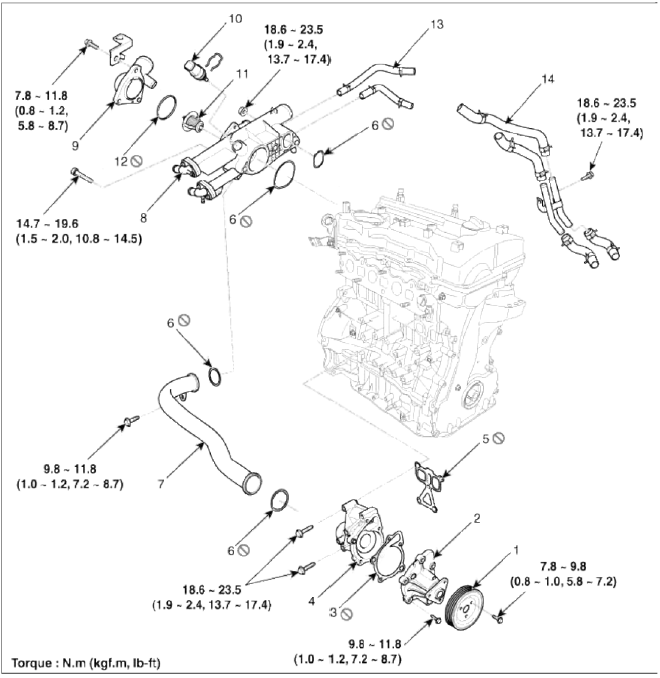
- Water pump pulley
- Water pump sub assembly
- Water pump gasket
- Water pump cover
- Water pump cover gasket
- O-ring
- Water inlet pipe
- Water temperature control assembly
- Water inlet fitting
- Engine coolant temperature sensor
- Thermostat
- Thermostat gasket
- Throttle body coolant hoses
- Oil cooler coolant hoses
Repair procedures
Removal and Installation
1. Loosen the drain plug, and then drain the engine coolant. Remove the radiator cap to drain with speed.
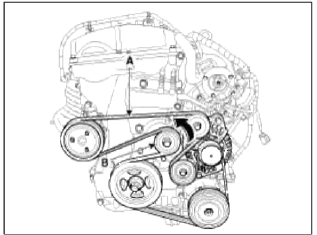
2. Remove the drive belt (A) after turning the drive belt tensioner (B) counterclockwise.
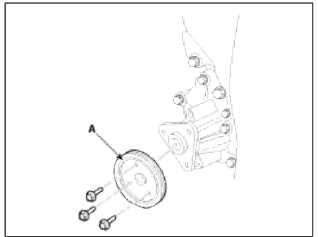
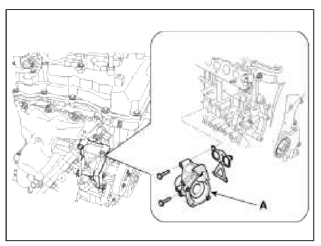
3. Remove the water pump pulley (A).
Tightening torque: 7.8 ~ 9.8N.m (0.8 ~ 1.0kgf.m, 5.8 ~ 7.2lb-ft)
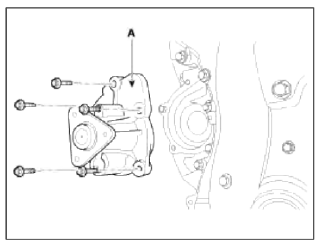
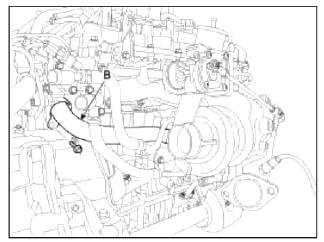
4. Remove the water pump sub assembly (A) with the gasket.
Tightening torque: 9.8 ~ 11.8N.m (1.0 ~ 1.2kgf.m, 7.2 ~ 8.7lb-ft)
5. Remove the exhaust manifold heat protectors (A).
Tightening torque: 7.8 ~ 11.8N.m (0.8 ~ 1.2kgf.m, 5.8 ~ 8.7lb-ft)
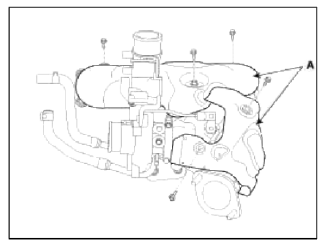
6. Remove the water pump cover (A) with the gasket and the water inlet pipe (B).
Tightening torque: 18.6 ~ 23.5N.m (1.9 ~ 2.4kgf.m, 13.7 ~ 17.4lb-ft)
Tightening torque: 9.8 ~ 11.8N.m (1.0 ~ 1.2kgf.m, 7.2 ~ 8.7lb-ft)
7. Installation is reverse order of removal with a new water pump gasket.
8. Fill the engine coolant.
9. Start the engine and check for leaks.
10. Recheck the coolant level.
Inspection
1. Check each part for cracks, damage or wear, and replace the coolant pump assembly if necessary.
2. Check the bearing for damage, abnormal noise and sluggish rotation, and replace the coolant pump assembly if necessary.
3. Check for coolant leakage. If coolant leaks from hole, the seal is defective. Replace the coolant pump assembly.
NOTE
A small amount of "weeping" from the bleed hole is normal.
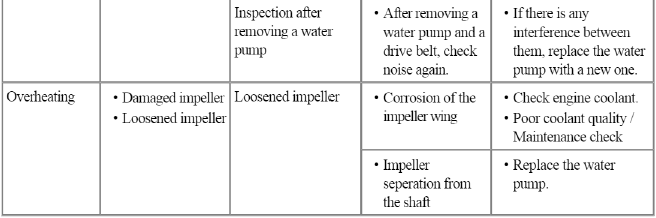
Troubleshooting
Troubleshooting
Water Pump

READ NEXT:
 Thermostat
Repair procedures
Removal and Installation
NOTE
Disassembly of the thermostat would have an adverse effect, causing a
lowering of cooling efficiency. Do not
remove the thermostat, even if the en
Engine Oil
Repair procedures
Oil And Filter Replacement
CAUTION
Prolonged and repeated contact with mineral oil will result in the
removal of natural fats from the skin, leading to
dryness, irritation
SEE MORE:
Components and Components Location | Relay Box (Engine Compartment)
Component Location
[Engine Room Relay Box]
Main relay
Cooling fan relay (High)
Windshield deicer relay
Wiper relay (High)
Wiper relay (Low)
ATM relay
Rear glass defogger relay
Burglar horn relay
Start relay
Cooling fan relay (Low)
Hor
Explanation of scheduled maintenance items
Engine oil and filter
The engine oil and filter should be
changed at the intervals specified in the
maintenance schedule. If the vehicle is
being driven in severe conditions, more
frequent oil and filter changes are
required.
Drive belts
Inspect all drive belts for evidence of
cuts, cracks,
Content
- Home
- Kia Sportage - Fifth generation (NQ5) - (2022-2026) - Owner's Manual
- Kia Sportage - Second generation (JEKM) (2005-2015) - Body Workshop Manual
- Kia Sportage Third generation (SL) - (2011-2016) - Service and Repair Manual
- Sitemap
- Top articles
