Kia Sportage: CVVT Oil Control Valve (OCV)
Description and Operation
Description
Continuous Variable Valve Timing (CWT) system advances or retards the valve timing of the intake and exhaust valve in accordance with the ECM control signal which is calculated by the engine speed and load.
By controlling CVVT, the valve over-lap or under-lap occurs, which makes better fuel economy and reduces exhaust gases (NOx, HC) and improves engine performance through reduction of pumping loss, internal EGR effect, improvement of combustion stability, improvement of volumetric efficiency, and increase of expansion work.
This system consist of
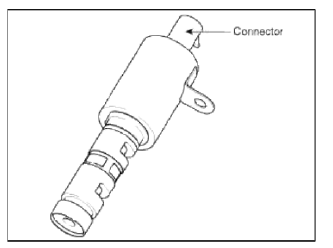
- the CVVT Oil Control Valve (OCV) which supplies the engine oil to the cam phaser or cuts the engine oil from the cam phaser in accordance with the ECM PWM (Pulse With Modulation) control signal,
- the CVVT Oil Temperature Sensor (OTS) which measures the engine oil temperature,
- and the Cam Phaser which varies the cam phase by using the hydraulic force of the engine oil.
The engine oil getting out of the CVVT oil control valve varies the cam phase in the direction (Intake Advance/Exhaust Retard) or opposite direction (Intake Retard/Exhaust Advance) of the engine rotation by rotating the rotor connected with the camshaft inside the cam phaser.
Specifications
Specifications
Schematic Diagrams
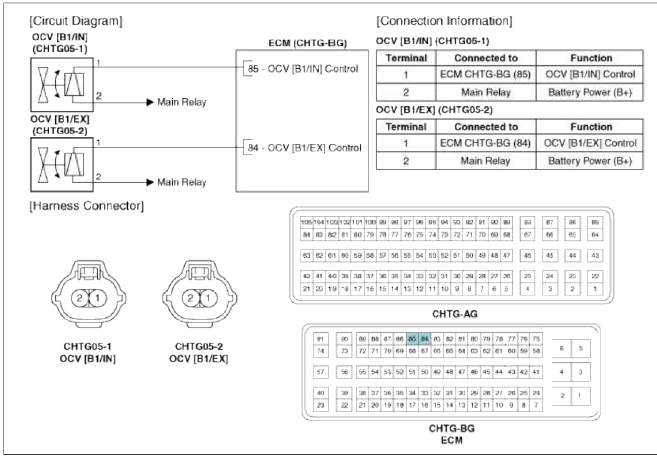
Circuit Diagram
Repair procedures
Inspection
1. Turn the ignition switch OFF.
2. Disconnect the OCV connector.
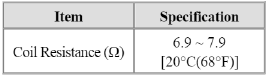
3. Measure resistance between the OCV terminals 1 and 2.
4. Check that the resistance is within the specification.
Specification: Refer to "Specification"
Removal
[Bank 1 / Intake]
1. Turn the ignition switch OFF and disconnect the battery negative (-) cable.
2. Remove the OTS (A).
3. Disconnect the CVVT oil control valve connector (B).
4. Remove the installation bolt (C), and then remove the valve from the engine.
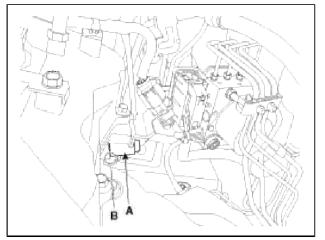
![[Bank 1 / Exhaust]](images/books/1921/22/index%2096.png)
[Bank 1 / Exhaust]
1. Turn the ignition switch OFF and disconnect the battery negative (-) cable.
2. Disconnect the CVVT oil control valve connector (A).
3. Remove the installation bolt (B), and then remove the valve from the engine.
Installation
CAUTION
- Install the component with the specified torques.
- Note that internal damage may occur when the component is dropped. If the component has been dropped, inspect before installing.
CAUTION
- Apply engine oil to the valve O-ring.
1. Installation is reverse of removal.
CVVT oil control valve installation bolt: 9.8 ~ 11.8 N.m (1.0 ~ 1.2 kgf.m. 7.2 ~ 8.7 lb-ft)
READ NEXT:
 Fuel Pressure Control Valve | Electric WGT Control Actuator
Description and Operation
Description
Fuel Pressure Regulator Valve is installed on the high pressure fuel pump and controls fuel flow flowing into the injectors in accordance with the ECM si
RCV Control Solenoid Valve | Canister Close Valve (CCV)
Description and Operation
Description
RCV (Recirculation Valve) Control Solenoid Valve is installed on the intercooler inlet pipe and operates the RCV actuator which controls the by-pass pass
SEE MORE:
Fuses
Blade type
Cartridge type
Multi fuse
BFT
* Left side: Normal, Right side: Blown
* The actual fuse/relay panel label may
differ from equipped items.
A vehicle's electrical system is protected
from electrical overload damage by
fuses.
This vehicle has 2 (or 3) fuse panels, on
Cruise Control (CC)
Cruise Control (CC) (if equipped)
Cruise indicator
Set speed
Cruise Control will allow you to drive at
speeds above 20 mph (30 km/h) without
depressing the accelerator pedal.
Cruise Control operation
To set speed
Accelerate to the desired speed,
which must be more than 20 mph
Content
- Home
- Kia Sportage - Fifth generation (NQ5) - (2022-2026) - Owner's Manual
- Kia Sportage - Second generation (JEKM) (2005-2015) - Body Workshop Manual
- Kia Sportage Third generation (SL) - (2011-2016) - Service and Repair Manual
- Sitemap
- Top articles
