Kia Sportage: Hands Free Switch | Hands Free Mic
Components and Components Location
Component Location
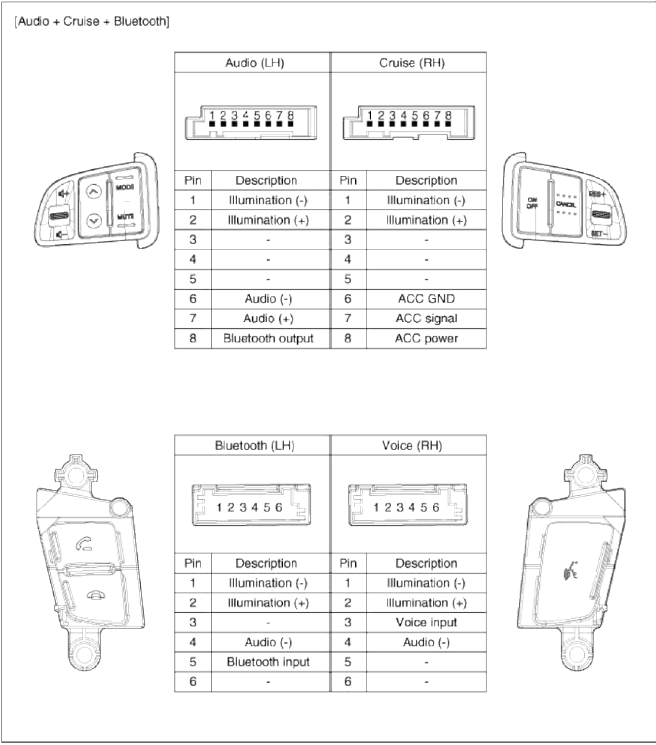
[Audio + Cruise + Bluetooth]
![[Audio + Cruise + Bluetooth]](images/books/1921/12/index%20114.png)
[Audio + Cruise + Bluetooth]
Repair procedures
Inspection
1. Check the handsfree remote control switch for resistance between No.3 and No.4 terminals in each switch position.
![[Call + Hang up]](images/books/1921/12/index%20116.png)
[Call + Hang up]
![[Voice]](images/books/1921/12/index%20117.png)
[Voice]

Removal
1. Remove the driver airbag module.
(Refer to the RT group - "Airbag module")
2. Remove the steering wheel.
(Refer to the ST group - "Steering column and shaft")
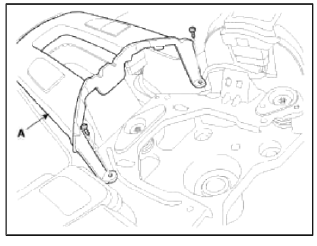
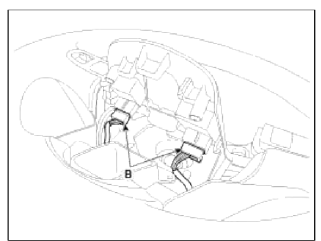
3. Remove the steering lower bezel (A) after loosening 2 screws and connector (B)
4. Remove the handsfree remote control switch.
Installation
1. Install the handsfree remote switch to the steering wheel bezel.
2. Install the steering wheel and bezel.
3. Reconnect the handsfree remote control switch connector and airbag connectors.
NOTE
Make sure that the switch connector is plugged in properly.
4. Install the driver airbag module.
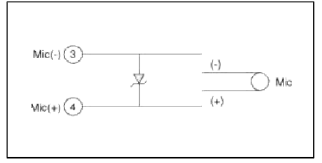
Hands Free Mic
Repair procedures
Inspection
1. Disconnect the negative(-) battery terminal.
2. Remove the roof trim.
(Refer to the BD group - "Roof trim")
3. Remove the handsfree mic (A) after loosening the connector and screws (3EA) from roof top.
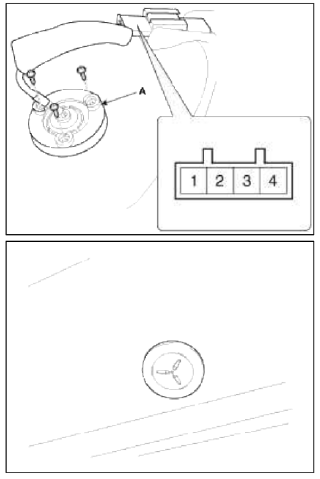
4. Check the continuity of Mic between terminals.
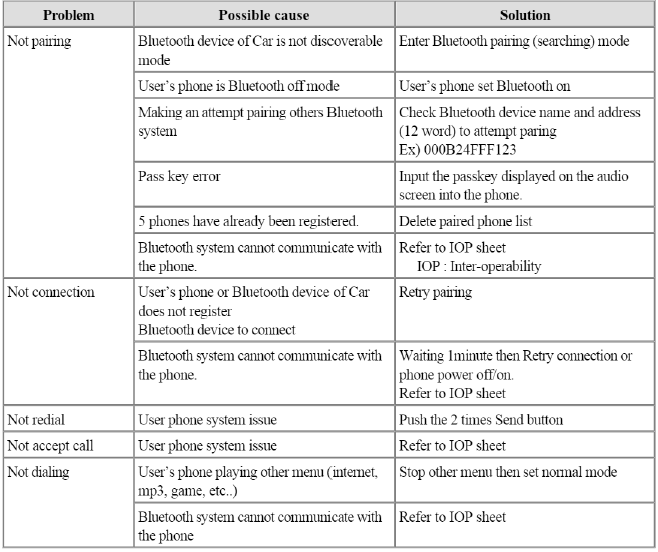
Troubleshooting
Troubleshooting
READ NEXT:
 Components and Components Location | Panoramaroof Switch | Panoramaroof Motor
Component Location
Panoramaroof
Panoramaroof switch
Panoramaroof motor & controller
Components
Panoramaroof frame assembly
Panoram
SEE MORE:
Condenser | Receiver-Drier
Components and Components Location
Component Location
Repair procedures
Inspection
1. Check the condenser fins for clogging and damage. If clogged, clean them with water, and blow them with compressed air. If bent, gently bend them using a screwdriver or pliers.
2. Check the condenser
Preparation of assembly
Applying spot sealer
Remove paint from the surface of new parts and body to be spot welded, and
apply spot sealer for rustproofing.
Selecting a welding method
If the thickness of the area to be welded with the panels overlapped is
greater than 0.1 in (3 mm), do plug welding
using a carbon ar
Content
- Home
- Kia Sportage - Fifth generation (NQ5) - (2022-2026) - Owner's Manual
- Kia Sportage - Second generation (JEKM) (2005-2015) - Body Workshop Manual
- Kia Sportage Third generation (SL) - (2011-2016) - Service and Repair Manual
- Sitemap
- Top articles
