Kia Sportage: Installation - Repair procedures
Installation
Parking Brake Shoe [2WD]
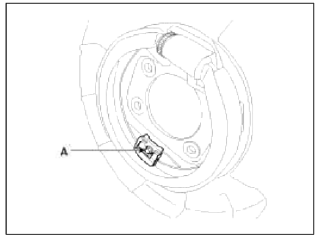
1. Install the brake shoe.
2. Fix the brake shoe with shoe hold clip and then install the bolt (A).
Tightening torque: 2.0 ~ 4.9 N.m (0.2 ~ 0.5 kgf.m, 1.4 ~ 3.6 lb-ft)
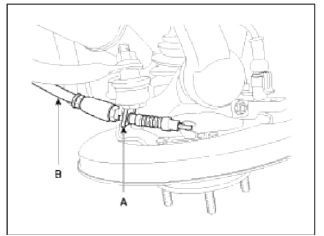
3. Install parking brake assembly and hub assembly.
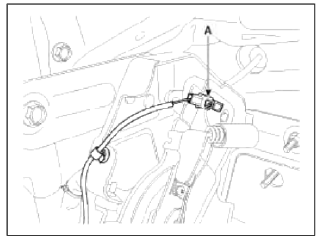
4. Install the parking brake cable (B), then install the clip (A).
5. Install the rear brake disc, then adjust the rear brake shoe clearance.
- Remove the plug from the disc.
- Rotate the toothed wheel of adjuster by a screw driver until the disc is not moving, and then return it by 3 notches in the opposite direction.
6. Install the brake caliper assembly. (Refer to "Rear brake installation")
7. Install the tire and wheel, after installing the plug on the disc.
8. If the parking brake shoe or the brake disc are replaced a newly one, perform the brake shoe bed-in procedure.
- Hand type - While operating the parking brake pedal for 68.6N (7kgf,
15.4 lbf) effort, drive the vehicle 500
meters (0.31 miles) at the speed of 30kph (18.6 mph).
Foot type - While operating the parking brake lever for 147N (15kgf, 33 lbf) effort, drive the vehicle 500 meters (0.31 miles) at the speed of 30kph (18.6 mph).
- Repeat the above procedure more than three times.
- Must be held on 20% uphill.
CAUTION
After adjusting parking brake, notice following matter:
1. Must be free from troubles when the parking pedal is operated at 686.5 N (70 kgf, 154 lbf).
2. Check that all parts move smoothly.
3. The parking brake indicator lamp must be on after the parking pedal is working and must be off after the pedal is released.
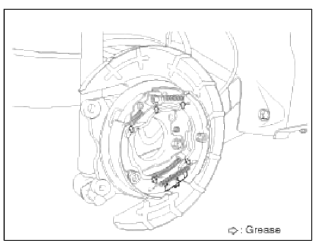
Parking Brake Shoe [4WD]
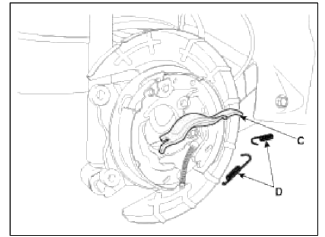
1. Install the brake shoe (A) to the back plate (B).

2. Install the shoe hold down pin (C) and the spring (D) by pushing the retainer spring (D) and turning the pins.
3. After installing the stint (C) and upper return spring (D). install the adjuster assembly and the lower return spring.
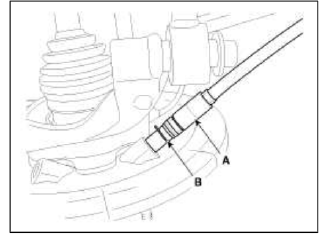
4. Install the parking brake cable (A), then install the retaining (B).
5. Apply a coating of the specified grease to each sliding parts of parking brake as shown.
Specified grease : Multi purpose grease SAE J310, NLGI No.2
6. Install the rear brake disc, then adjust the rear brake shoe clearance.
- Remove the plug from the disc.
- Rotate the toothed wheel of adjuster by a screw driver until the disc is not moving, and then return it by 3 notches in the opposite direction.
7. Install the brake caliper. (Refer to "Rear brake installation")
8. Install the tire and wheel.
9. If the parking brake shoe or the brake disc are replaced a newly one, perform the brake shoe bed-in procedure.
- Hand type - While operating the parking brake pedal for 68.6N (7kgf,
15.4 lbf) effort, drive the vehicle 500
meters (0.31 miles) at the speed of 30kph (18.6 mph).
Foot type - While operating the parking brake lever for 147N (15kgf, 33 lbf) effort, drive the vehicle 500 meters (0.31 miles) at the speed of 30kph (18.6 mph).
- Repeat the above procedure more than three times.
- Must be held on at 20% uphill.
CAUTION
After adjusting parking brake, notice following matter:
1. Must be free from troubles when the parking pedal is operated at 686.5 N (70 kgf, 154 lbf).
2. Check that all parts move smoothly.
3. The parking brake indicator lamp must be on after the parking pedal is working and must be off after the pedal is released.
Parking Brake Lever [Hand Type]
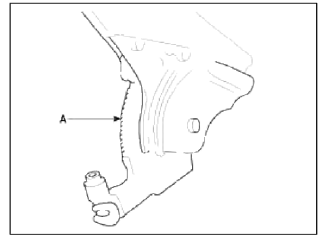
1. Install the parking brake lever assembly, then tighten the mounting bolts (A).
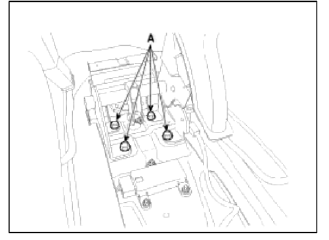
2. Apply a coating of the specified grease to each sliding parts (A) of the ratchet plate or the ratchet pawl.
Specified grease : Multi purpose grease SAE J310, NLGI No.2
3. Install the parking brake cable adjuster, then adjust the parking brake lever stroke by turning adjusting nut (A).
Parking brake lever stroke : 6 cliks (Pull the lever with 20kgf)
NOTE
After repairing the parking brake shoe, adjust the brake shoe clearance, and then adjust the parking brake lever stroke. (Refer to "Parking brake shoe installation")
4. Release the parking brake lever fully, and check that parking brakes do not drag when the rear wheels are turned. Readjust if necessary.
5. Make sure that the parking brakes are fully applied when the parking brake lever is pulled up fully.
6. Reconnect the connector of parking brake switch.
NOTE
Inspect the continuity of par king brake switch.
When the brake lever is pulled: continuity
When the brake lever is released : no continuity
7. Install the floor console bracket (A).
8. Install the floor console. (Refer to Body group - "Floor console")
Parking Brake Pedal [Foot type]
1. Install the parking brake cable.
2. Install the holding clip (B) and the cable adjusting nut (A) after fixing the parking brake cable.
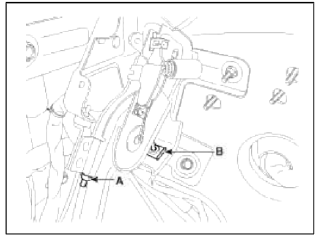
3. Install the parking brake pedal, and then install the parking brake pedal mounting bolts (A) and nut (B).

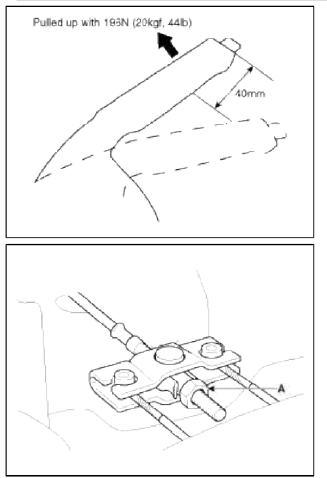
4. Install the parking brake cable mounting nut (A).
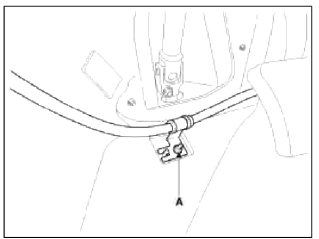
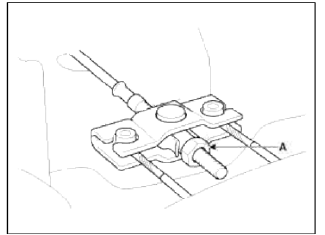
5. Adjust the parking brake pedal stroke by turning the adjusting nut (A).
- Operate the parking brake pedal through a full stroke over 3 times for setting the parking cables.
- Adjust the adjusting nut (A) for parking brake pedal stroke 4 notches when operating effort is 196N (20kgf. 44lb).
CAUTION
1. The parking brake adjustment must be carried out after adjusting the rear shoe.
2. After adjusting parking brake, notice following matter.
- Must be flee from clearance between adjusting nut and pin.
- Check securely that the brake is not dragging.
6. Reconnect the parking brake switch connector (A).
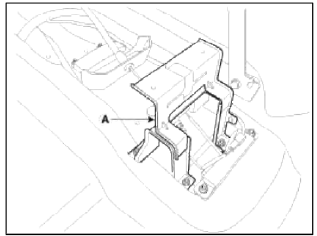
7. Install the junction box. (Refer to the Body Electrical System group - Fuses and Relays)
8. Install the reinforcement panel and crash pad lower panel. (Refer to Body group - Crash pad)
READ NEXT:
 Adjustment - Repair procedures
Adjustment
Parking Brake Shoe Clearance Adjustment [2WD]
1. Raise the vehicle, and make sure it is securely supported.
2. Remove the rear tire and wheel.
3. Remove the plug from the disc.
4.
Components and Components Location | Description and Operation
Components
HECU module
Front wheel speed sensor
Rear wheel speed sensor
Yaw rate & Lateral & Longitudinal G sensor
Steering angle sensor
ABS Warning la
SEE MORE:
Crankshaft Position Sensor (CKPS)
Description and
Operation
Description
Crankshaft Position Sensor (CKPS) detects the crankshaft position and is one
of the most important sensors of the
engine control system. If there is no CKPS signal input, the engine may stop
because of CKPS signal missing. This sensor is installed
Anti-lock Brake System (ABS)
The Anti-lock Brake System (ABS) prevents
the wheels from locking. So the
vehicle remains stable and can still be
steered.
ABS (or ESC) will not prevent accidents
due to improper or dangerous driving
maneuvers. Even though vehicle control
is improved during emergency braking,
always mainta
Content
- Home
- Kia Sportage - Fifth generation (NQ5) - (2022-2026) - Owner's Manual
- Kia Sportage - Second generation (JEKM) (2005-2015) - Body Workshop Manual
- Kia Sportage Third generation (SL) - (2011-2016) - Service and Repair Manual
- Sitemap
- Top articles
