Kia Sportage: Rear Seat Belt
Repair procedures
Replacement
Rear Seat Belt Replacement
CAUTION
- When installing the belt, make sure not to damaged the retractor.
1. Remove the following items first.
- Rear seat assembly (Refer to the BD group - "Rear Seat")
- Front door scuff trim & Rear door scuff trim (Refer to the BD group - "Interior Trim")
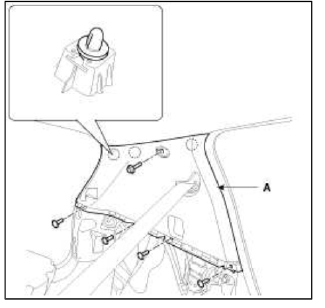
2. Remove the clips and rear transverse trim (A).

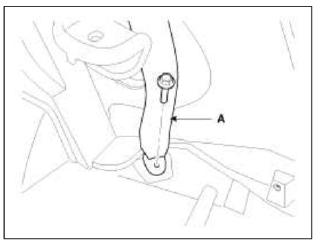
3. After loosening the mounting bolt, then remove the rear seat belt lower anchor (A).
Tightening torque: 39.2 ~ 53.9 N.m (4.0 ~ 5.5 kgf.m, 28.9 ~ 39.8 lb-ft)
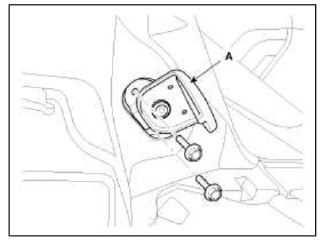
4. After loosening the mounting bolts, then remove the rear seat mounting bracket (A).
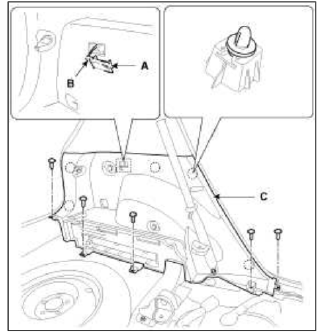
5. Using a screwdriver or remover, remove the lamp (A).
6. Disconnect the connector (B).
7. After loosening the mounting screws, then remove the luggage side trim (C).
8. Disconnect the connector (A).
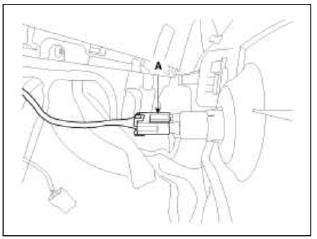
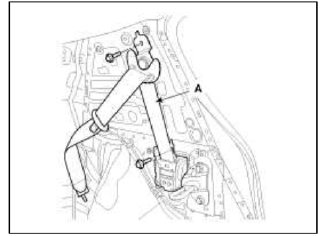
9. After loosening the mounting bolt and screws, then remove the rear pillar trim (A).
10. After loosening the mounting bolts, then remove the rear seat belt (A).
Tightening torque: 39.2 ~ 53.9 N.m (4.0 ~ 5.5 kgf.m, 28.9 ~ 39.8 lb-ft)
11. Installation is the reverse of removal.
NOTE
- Replace any damaged clips.
- Make sure the connectors are plugged in properly.
Rear Seat Belt Buckle Replacement
1. Remove the rear seat.
(Refer to the BD group - "Rear Seat")
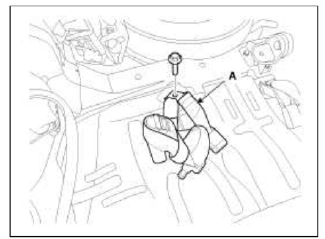
2. After loosening the mounting bolt, then remove the rear seat belt buckle (A).
Tightening torque: 39.2 ~ 53.9 N.m (4.0 ~ 5.5 kgf.m, 28.9 ~ 39.8 lb-ft)
[LH]
![[RH]](images/books/1921/6/index%2083.png)
[RH]
Tightening torque: 39.2 ~ 53.9 N.m (4.0 ~ 5.5 kgf.m, 28.9 ~ 39.8 lb-ft)
3. Installation is the reverse of removal.
READ NEXT:
 General Information
General Information
General Troubleshooting Information
Before Troubleshooting
1. Check applicable fuses in the appropriate fuse/relay box.
2. Check the battery for damage, state of charge
SEE MORE:
Towing
Towing service
If emergency towing is necessary, have
it done by authorized Kia dealer or a
commercial tow-truck service.
Proper lifting and towing procedures are
necessary to prevent damage to the
vehicle. The use of wheel dollies (1) or
flatbed is recommended.
CAUTION
The AWD vehicl
Exterior Lighting Control
Tail Lamp Control
1. This function describes the following features
Turn on and off Tail Lamp by switch input.
Turn on and off Tail Lamp in Auto Light Control command.
Automatically cut off Tail Lamps if a driver forgets to turn them off.
Output control of Tail Lamp.
2. Tail Auto
Content
- Home
- Kia Sportage - Fifth generation (NQ5) - (2022-2026) - Owner's Manual
- Kia Sportage - Second generation (JEKM) (2005-2015) - Body Workshop Manual
- Kia Sportage Third generation (SL) - (2011-2016) - Service and Repair Manual
- Sitemap
- Top articles
