Kia Sportage: Replacing front turn signal lamp (Bulb type)/ Replacing rear turn signal lamp, stop lamp (Bulb type)
Kia Sportage - Fifth generation (NQ5) - (2022-2025) - Owner's Manual / Maintenance / Light bulbs / Replacing front turn signal lamp (Bulb type)/
Replacing rear turn signal lamp, stop lamp (Bulb type)
Replacing front turn signal lamp (Bulb type)
- Turn off vehicle and disconnect the negative terminal from the battery.
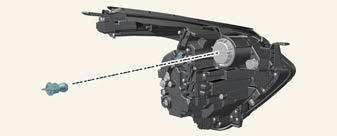
- Remove the socket from the assembly by turning the socket counterclockwise until the tabs on the socket align with the slots on the assembly.
- Remove the bulb from the socket by pressing it in and rotating it counterclockwise until the tabs on the bulb align with the slots in the socket. Pull the bulb out of the socket
- Insert a new bulb by inserting it into the socket and rotating it until it locks into place.
- Install the socket in the assembly by aligning the tabs on the socket with the slots in the assembly. Push the socket into the assembly and turn the socket clockwise.
- Connect the negative terminal from the battery.
Replacing rear turn signal lamp, stop lamp (Bulb type)
- Turn off vehicle and disconnect the negative terminal from the battery.
- Open the liftgate.
- Open the service cover.
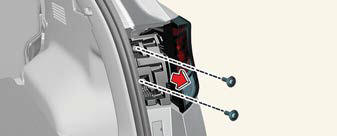
- Loosen the light assembly retaining screws with a cross-tip screw driver.
- Remove the rear combination lamp assembly from the body of the vehicle.
- Disconnect the rear combination lamp connector.
- Remove the socket from the assembly by turning the socket counterclockwise until the tabs on the socket align with the slots on the assembly.
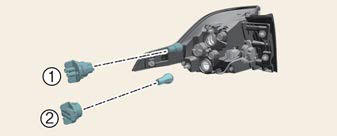
1) Stop lamp bulb2) Rear turn signal lamp bulb
- Remove the bulb from the socket by pressing it in and rotating it counterclockwise until the tabs on the bulb align with the slots in the socket. Pull the bulb out of the socket.
- Insert a new bulb by inserting it into the socket and rotating it until it locks into place.
- Install the socket in the assembly by aligning the tabs on the socket with the slots in the assembly.Push the socket into the assembly and turn the socket clockwise.
- Install the rear combination lamp assembly to the body of the vehicle.
- Install the service cover.
High mounted stop lamp (LED type) replacement
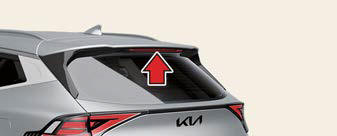
If the LED lamp does not operate, have the system inspected by an authorized Kia dealer.
The LED lamps cannot be replaced as a single unit because it is an integrated unit. The LED lamps has to be replaced with the unit.
A skilled technician should check or repair the LED lamp, for it may damage related parts of the vehicle.
READ NEXT:
 Replacing license plate lamp (Bulb type)
Turn off vehicle and disconnect the
negative terminal from the battery.
Using a flat-blade screwdriver, gently
pry the lens cover from lamp housing
Remove the bulb by pulling it straigh
Replacing vanity mirror lamp (Bulb type)
WARNING
Interior lamps
Prior to working on the Interior lamps,
ensure that the "OFF" button is
depressed to avoid burning your fingers
or receiving an electric shock.
Turn off v
SEE MORE:
Specifications, Special Service Tools
Specifications
Specifications
Fuel Delivery System
Sensors
Manifold Absolute Pressure Sensor (MAPS) #1
Type: Piezo-resistive pressure sensor type
Specification
Intake Air Temperature Sensor (IATS)
Type: Thermistor type
Specification
Manifold Absolute
Front seat adjustment for power seat
The front seat can be adjusted by using
the control switches located on the outside
of the seat cushion.
Before driving, adjust the seat to the
proper position so you can easily control
the steering wheel, pedals and switches
on the instrument panel.
CAUTION
Power seating adjustments
T
Content
- Home
- Kia Sportage - Fifth generation (NQ5) - (2022-2025) - Owner's Manual
- Kia Sportage - Second generation (JEKM) (2005-2015) - Body Workshop Manual
- Kia Sportage Third generation (SL) - (2011-2016) - Service and Repair Manual
- Sitemap
- Top articles
