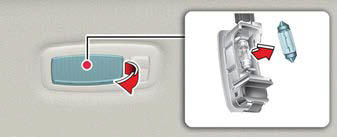
Kia Sportage: Replacing vanity mirror lamp (Bulb type)
WARNING
Interior lamps
Prior to working on the Interior lamps, ensure that the "OFF" button is depressed to avoid burning your fingers or receiving an electric shock.
- Turn off vehicle and disconnect the negative terminal from the battery.
- Using a flat-blade screwdriver, gently pry the lamp assembly from interior.
- Remove the bulb by pulling it straight out.
- Install a new bulb in the socket.
- Install the lamp assembly to interior.
CAUTION
Be careful not to dirty or damage the lens, lens tab, and plastic housings.
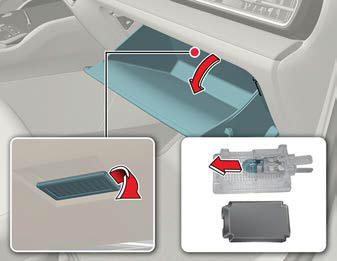
Replacing glove box lamp (Bulb type)
WARNING
Interior lamps
Prior to working on the Interior lamps, ensure that the "OFF" button is depressed to avoid burning your fingers or receiving an electric shock.
- Turn off vehicle and disconnect the negative terminal from the battery.
- Using a flat-blade screwdriver, gently pry the lamp assembly from interior.
- Remove the cover from the lamp assembly.
- Remove the bulb by pulling it straight out.
- Install a new bulb in the socket.
- Install the cover to the lamp assembly.
- Install the lamp assembly to interior.
CAUTION
Be careful not to dirty or damage the lens, lens tab, and plastic housings.
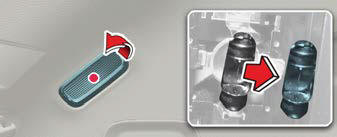
Replacing luggage lamp (Bulb type)
WARNING
Interior lamps
Prior to working on the Interior lamps, ensure that the "OFF" button is depressed to avoid burning your fingers or receiving an electric shock.
- Turn off vehicle and disconnect the negative terminal from the battery.
- Using a flat-blade screwdriver, gently pry the lamp assembly from interior.
- Remove the cover from the lamp assembly.
- Remove the bulb by pulling it straight out.
- Install a new bulb in the socket.
- Install the cover to the lamp assembly.
- Install the lamp assembly to interior.
CAUTION
Be careful not to dirty or damage the lens, lens tab, and plastic housings.
Replacing lights (LED type)
If the LED lamp does not operate, have your vehicle checked by an authorized Kia dealer. The LED lamp cannot be replaced as a single component because it is an integrated unit. The LED lamp has to be replaced with the unit.
A skilled technician should check or repair the LED lamp, for it may damage related parts of the vehicle.
READ NEXT:
 Exterior care
Use the information in the following sections
to keep the exterior and interior of
your vehicle clean.
Exterior care
Use the information in the following sections
to maintain the exterior of your
Waxing
Wax the vehicle when water will no longer
bead on the paint.
Always wash and dry the vehicle before
waxing. Use a good quality liquid or
paste wax, and follow the manufacturer's
instruction
SEE MORE:
Window opening and closing
Windows
The doors of this vehicle are equipped with power windows that can be
operated by
a switch.
Driver's door power window switch
Front passenger's door power window switch
Rear door (left) power window switch
Rear door (right) power window switch
Power window lock swit
Hood open warning
The hood warning message will appear
on the LCD display when hood is open.
The warning chime will operate when
the vehicle is being driven at or above 2
mph (3 km/h) with the hood open.
Closing the hood
Before closing the hood, check the
following:
All filler caps in the eng
Content
- Home
- Kia Sportage - Fifth generation (NQ5) - (2022-2026) - Owner's Manual
- Kia Sportage - Second generation (JEKM) (2005-2015) - Body Workshop Manual
- Kia Sportage Third generation (SL) - (2011-2016) - Service and Repair Manual
- Sitemap
- Top articles
