Kia Sportage: Turn Signal Lamp | Room Lamp
Repair procedures
Removal
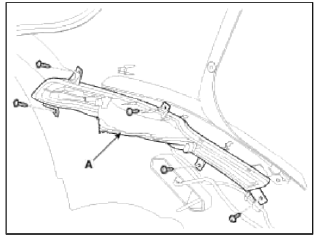
Rear Turn Signal Lamp
1. Disconnect the negative (-) battery terminal.
2. Remove the rear bumper.
(Refer to BD group - "Rear Bumper")
3. Disconnect the connector. Remove the rear turn signal lamp (A) after loosening 5 screws.
4. Replace the bulb (A) of rear turn signal lamp.
If replacing the bulb only, you could work it without removing the rear bumper.
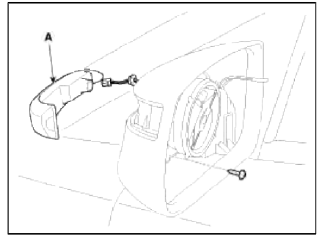
Door Mirror Turn Signal Lamp
1. Disconnect the negative (-) battery terminal.
2. Remove the mirror from the mirror holder.
Be careful not to damage to the clip.
3. Remove the door mirror turn signal lamp (A) after disassembling screw and connector.
Installation
Rear Turn Signal Lamp
1. Install the bulb to the rear turn signal lamp assembly.
2. Install the rear turn signal lamp to the rear bumper.
Door Mirror Turn Signal Lamp
1. Install the door mirror turn signal lamp to the door mirror.
2. Install the door mirror.
3. Connect the battery terminal (-).
Room Lamp
Repair procedures
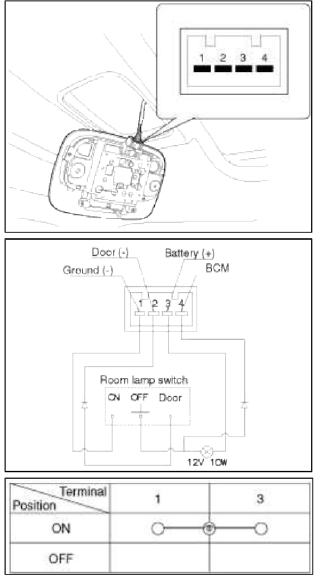
Inspection
1. Remove the room lamp assembly connector then check for continuity between terminals.
Removal
1. Disconnect the negative (-) battery terminal.
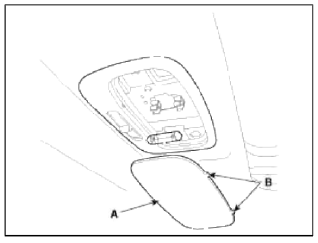
2. Detach the lamp lens (A) from the room lamp with a flat-tip screwdriver.
NOTE
Take care not to damage the part (B).
3. Loosen the fixing screws (2EA).
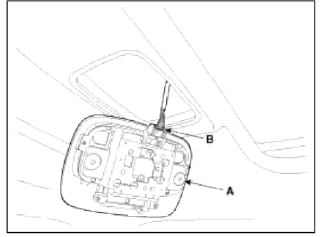
4. Remove the room lamp assembly (A) after disconnecting the connector (B).
Installation
1. Install the room lamp assembly after connecting the lamp connector.
2. Install the lamp lens after assembling the bulb.
READ NEXT:
 Overhead Console Lamp | Hazard Lamp Switch
Repair procedures
Inspection
Remove the overhead console lamp assembly then check for continuity between terminals. If the continuity is not as specified, replace the map lamp switch.
SEE MORE:
Lane Following Assist operation
Lane Following Assist will control and
warn the vehicle by 'Lane Following
Assist' and 'Hands-off warning'.
Lane Following Assist
If the vehicle ahead and/or both lane
markings are detected and your vehicle
speed is below 110 mph (180 km/h),
Lane Following Assist will help
AUX (Auxiliary) Jack
Description and Operation
Description
The multimedia jack on the console tipper cover is for customers who like to
listen to external portable music
players like the MP3, iPod and etc., through the vehicle's sound system when it
is linked to this jack. The customer
has this added o
Content
- Home
- Kia Sportage - Fifth generation (NQ5) - (2022-2026) - Owner's Manual
- Kia Sportage - Second generation (JEKM) (2005-2015) - Body Workshop Manual
- Kia Sportage Third generation (SL) - (2011-2016) - Service and Repair Manual
- Sitemap
- Top articles
