Kia Sportage: Components and ComponentsLocation | Description and Operation
Components Location
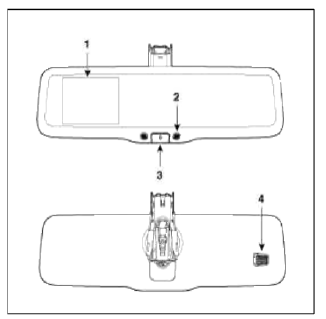
[ECM]
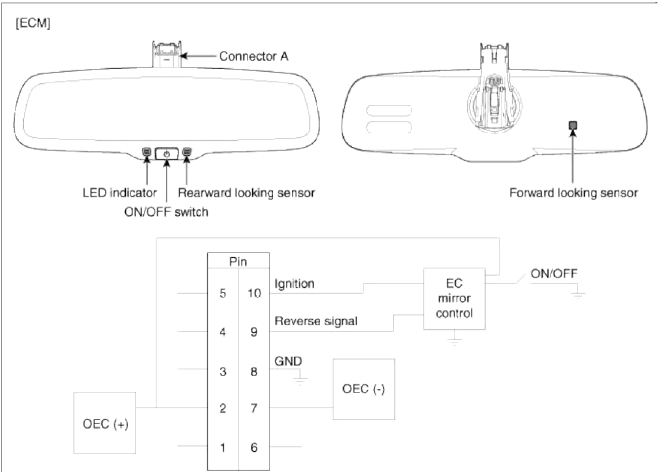

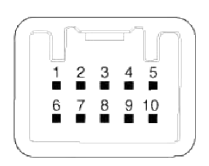
- -
- OEC (+)
- -
- -
- -
- -
- OEC (-)
- GND
- Reverse signal
- IGN (+)
[Reverse Display]
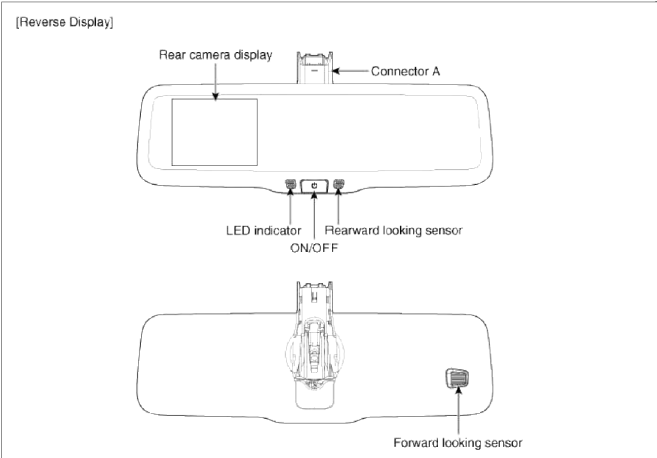
- Camera power (-)
- OEC (+)
- Camera power (+)
- Video (+)
- Video (-)
- -
- OEC (-)
- GND
- Reverse signal
- IGN (+)
Description and Operation
Description
The ECM (Electro Chromatic inside rear view Mirror) is for dimming the reflecting light from a vehicle behind at night, in order the user not to be dazzled by the light. The forward facing sensor detects brightness of the surroundings, while the rearward looking sensor the strength of the reflecting light so that adjusts the reflexibility of the mirror in the range of 7-85%. But, when the reverse gear is engaged, it stops functioning.
1. The forward facing sensor sees if the brightness of the surroundings is low enough for the mirror to operate its function.
2. The rearward looking sensor detects glaring of the reflecting light from a vehicle behind.
3. The ECM is darkened to the level as determined by the rearward looking sensor. When the glaring is no longer detected, the mirror stops functioning.
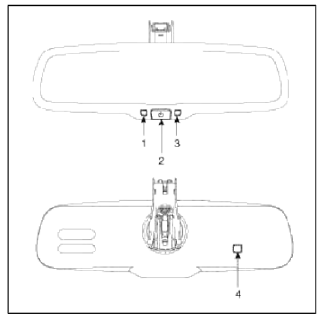
- LED indicator
- ON/OFF Switch
- Rearward looking sensor
- Forward facing sensor
Reverse Display Room Mirror
Description
The back view camera system, located on the tailgate, provides a video image (which appeals in the rear view mirror) of the area behind the vehicle. It adds assistance to the driver while reversing or reverse parking the vehicle.
To use the back view camera system, place the transmission in R (Reverse): an image will display on the left portion of the rear view mirror. The area displayed on the screen may vary according to the vehicle orientation and/or road condition.
- Rear camera display
- Rearward looking sensor
- Power button
- Forward facing sensor
Use the side mirrors and back view mirror to get better coverage on both sides and rear of the vehicle. When shifting out of reverse and into any other gear, the image will remain on for a few seconds before it shuts off to assist in parking or trailer hookup.
The camera lens for the back view camera system is located on the tailgate, near the tailgate handle. Keep the lens clean so the video image remains clear and undistorted. Clean the lens with a soft, lint-free cloth and non-abrasive cleaner.
NOTE
If the back view camera system image is not clear or seems distorted, it may be covered with water droplets, snow, mod or any other substance. If this occurs, clean the camera lens before using the reverse camera system.
WARNING
The back view camera system is a reverse aid supplement device that still requires the driver to use it in conjunction with the back view mirror and the side mirrors for maximum coverage.
WARNING
Objects that are close to either corner of the bumper or under the bumper, might not be seen on the screen due to the limited coverage of the back view camera system.
WARNING
Backup as slow as possible since higher speeds might limit your reaction time to stop the vehicle.
WARNING
Do not use the back view camera system with the tailgate open.
If the back end of the vehicle is hit or damaged, then check with your authorized dealer to have your rear video system checked for proper coverage and operation.
Nighttime and dark area use
At night time or in dark areas, the back view camera system relies on the reverse lamp lighting to produce an image.
Therefore it is necessary that both reverse lamps are operating in order to get a clear image in the dark. If either of the lamps are not operating, stop using the back view camera system, at least in the dark, until the lamp(s) are replaced and functioning.
Automatic-dimming Function
To protect your vision during nighttime driving, your min or will automatically dim upon detecting glare from the vehicles traveling behind you. The auto-dimming function can be controlled by the Dimming ON/OFF Button:
1. Pressing and holding the Feature Control button for more than 3 but less than 6 seconds turns the auto-dimming function OFF which is indicated by the green Status Indicator LED turning off.
2. Pressing and holding the Feature Control button again for more than 3 but less than 6 seconds turns the auto-dimming function ON which is indicated by the green Status Indicator LED turning on.
NOTE
The mirror defaults to the "ON" positron each time the vehicle is started.
READ NEXT:
 Repair procedures
Inspection
Check it by the procedure below to see if the function of the ECM is normal.
1. Turn the ignition key to the "ON" position.
2. Cover the forward facing sensor.
3. He
SEE MORE:
Engine Control Module (ECM)
Schematic Diagrams
ECM Terminal And Input/Output signal
ECM Terminal Function
Connector [CHTG-AG]
Connector [CHTG-BG]
ECM Terminal Input/Output signal
Connector [CHTG-AG]
Connector [CHTG-BG]
Circuit Diagram
Repair procedures
Removal
CA
Cylinder Head | Removal - Repair procedures - Cylinder Head
Components and Components Location
Components
Camshaft bearing cap
Camshaft front bearing cap
Exhaust camshaft
Intake camshaft
Exhaust CVVT assembly
Intake CVVT assembly
Exhaust camshaft upper bearing
Exhaust camshaft lower bearing
MLA
Ret
Content
- Home
- Kia Sportage - Fifth generation (NQ5) - (2022-2026) - Owner's Manual
- Kia Sportage - Second generation (JEKM) (2005-2015) - Body Workshop Manual
- Kia Sportage Third generation (SL) - (2011-2016) - Service and Repair Manual
- Sitemap
- Top articles
