Kia Sportage: Repair procedures
Inspection
Check it by the procedure below to see if the function of the ECM is normal.
1. Turn the ignition key to the "ON" position.
2. Cover the forward facing sensor.
3. Head a light to the rearward looking sensor.
4. The ECM should be darkened as soon as the rearward looking sensor detects the light
NOTE
If this test is performed in daytime, the ECM may be darkened as soon as the forward facing sensor is covered.
5. When the reverse gear is engaged, the ECM should not be darkened.
When heading lights to both the forward facing and rearward looking sensors, the ECM should not be darkened.
Removal
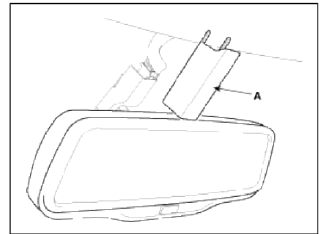
1. Remove the mirror wiring cover (A).
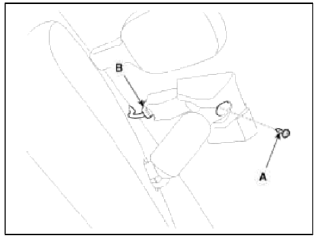
2. Remove the mirror mounting screw (A) and connector (B).
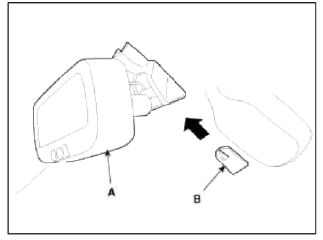
3. Remove the mirror (A) pulling up in the arrow direction.
NOTE
Make sure not to damage the mounting bracket (B) when removing the mirror.
Installation
1. Install the mirror making sure the mounting bracket not to be damaged.
2. Install the mirror wiring cover after reconnecting the connector and tightening the screw.
READ NEXT:
 Components and Components Location | Description and Operation
Components
Hands free call switch
Mic
Front left speaker
Front right speaker
Audio head unit (hands free control)
There is no hands free jack. This system suppor
SEE MORE:
Blind-Spot Collision-Avoidance Assist malfunction and
limitations
Check Blind-Spot Safety system
When Blind-Spot Collision-Avoidance
Assist is not working properly, the warning message will appear on the cluster
for several seconds, and the master
warning light ( ) will appear. Have
Blind-Spot Collision-Avoidance Assist be
inspected by an authorized
Towing
Towing service
If emergency towing is necessary, have
it done by authorized Kia dealer or a
commercial tow-truck service.
Proper lifting and towing procedures are
necessary to prevent damage to the
vehicle. The use of wheel dollies (1) or
flatbed is recommended.
CAUTION
The AWD vehicl
Content
- Home
- Kia Sportage - Fifth generation (NQ5) - (2022-2026) - Owner's Manual
- Kia Sportage - Second generation (JEKM) (2005-2015) - Body Workshop Manual
- Kia Sportage Third generation (SL) - (2011-2016) - Service and Repair Manual
- Sitemap
- Top articles
