Kia Sportage: General Information, Troubleshooting, Special Service Tools
Kia Sportage Third generation (SL) - (2011-2016) - Service and Repair Manual / Heating, Ventilation, Air Conditioning / General Information, Troubleshooting, Special Service Tools
General Information
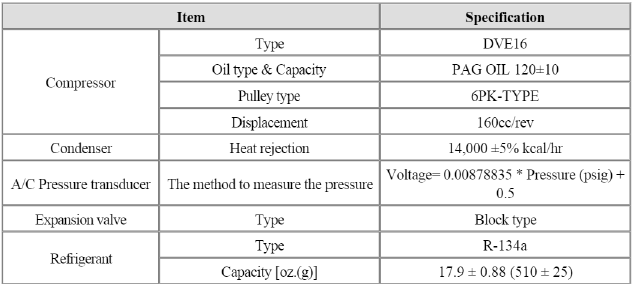
Specification
Air Conditioner
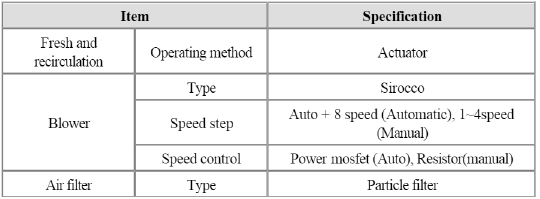
Blower Unit
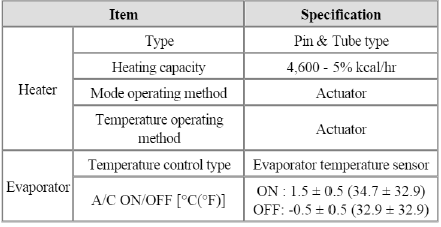
Heater And Evaporator Unit
Troubleshooting
Troubleshooting
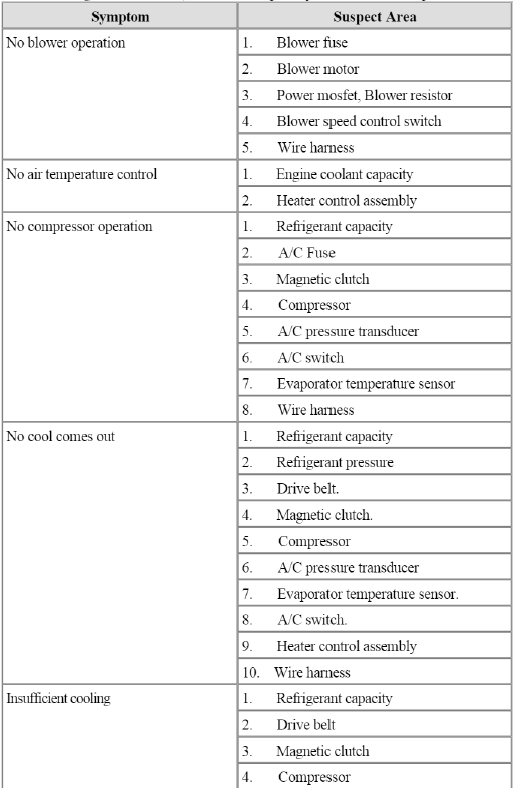
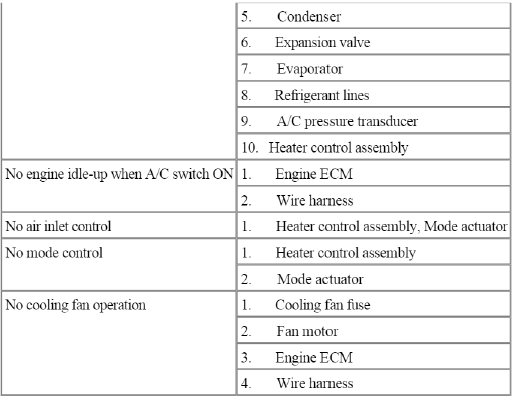
Problem Symptoms Table
Before replacing or repairing air conditioning components, first determine if the malfunction is due to the refrigerant charge, air flow or compressor.
Use the table below to help you find the cause of the problem. The numbers indicate the priority of the likely cause of the problem. Check each part in order. If necessary, replace these parts.
After collecting the malfunction, check the complete system to ensure that performance is satisfactory.
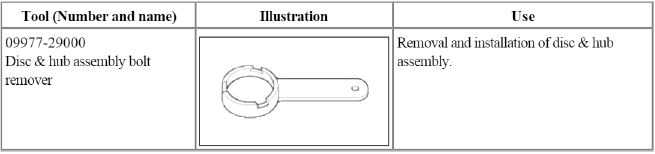
Special Service Tools
Special Service Tools
READ NEXT:
 General Safety Information and
Caution
General Safety Information and
Caution
Instructions
When Handling Refrigerant
1. R-134a liquid refrigerant is highly volatile. A drop on the skin of your
hand could result in localized frostbite.
When handling the refrigerant,
Repair procedures
Refrigerant System Service Basics
Refrigerant Recovery
Use only service equipment that is U.L-listed and is certified to meet the
requirements of SAE J2210 to remove
4FC-134a(R-134a) from t
SEE MORE:
Description and Operation, Schematic Diagrams
Description and Operation
Description
The Evaporative Emission Control System prevents fuel vapor stored in fuel
tank from vaporizing into the
atmosphere. When the fuel evaporates in the fuel tank, the vapor passes through
vent hoses or tubes to a canister
filled with charcoal.
The
Brake Assistant System(BAS)
The Brake Assistant System provides
additional pressure when the brake
pedal is momentarily and strongly
depressed in a situation sudden braking
is required while driving.
The Brake Assistant System reduces the
time for ABS(Anti-Lock Brake System)
control to enter and consequently
reduces
Content
- Home
- Kia Sportage - Fifth generation (NQ5) - (2022-2026) - Owner's Manual
- Kia Sportage - Second generation (JEKM) (2005-2015) - Body Workshop Manual
- Kia Sportage Third generation (SL) - (2011-2016) - Service and Repair Manual
- Sitemap
- Top articles
