Kia Sportage: Light bulb position (Front/ Rear)
Kia Sportage - Fifth generation (NQ5) - (2022-2026) - Owner's Manual / Maintenance / Light bulbs / Light bulb position (Front/ Rear)
Light bulb position (Front)
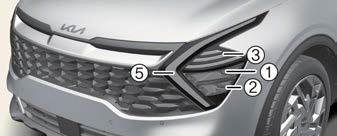
Headlamp - Type A
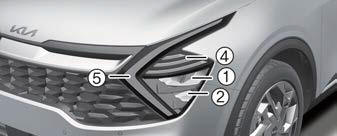
Headlamp - Type B
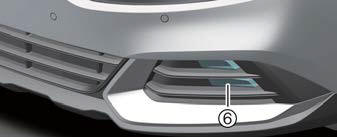
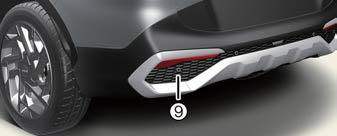
Fog lamp
- Headlamp (Low) (LED type)
- Headlamp (High) (LED type)
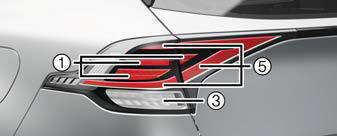
- Front turn signal lamp (Bulb type)
- Front turn signal lamp (LED type)
- Day time running lamp/Position lamp (LED type)
- Front fog lamp (LED type)
Light bulb position (Rear)
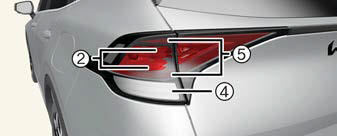
Rear combination lamp - Type A
Rear combination lamp - Type B
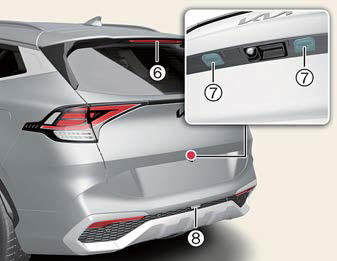
- Stop lamp (LED type)
- Stop lamp (Bulb type)
- Rear turn signal lamp (LED type)
- Rear turn signal lamp (Bulb type)
- Tail lamp (LED type)
- High mounted stop lamp (LED type)
- License plate lamp (Bulb type)
- Backup lamp (LED type)
- Rear side marker lamp (LED type)
Light bulb position (Side) (if equipped)
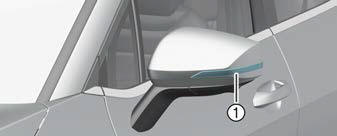
- Side repeater lamp (LED type)
Replacing lights (LED type)
If the LED lamp does not operate, have your vehicle checked by an authorized Kia dealer. The LED lamp cannot be replaced as a single component because it is an integrated unit. The LED lamp has to be replaced with the unit.
A skilled technician should check or repair the LED lamp, for it may damage related parts of the vehicle.
READ NEXT:
 Replacing front turn signal lamp (Bulb type)/
Replacing rear turn signal lamp, stop lamp (Bulb type)
Replacing front turn signal lamp (Bulb type)/
Replacing rear turn signal lamp, stop lamp (Bulb type)
Replacing front turn signal lamp (Bulb type)
Turn off vehicle and disconnect the
negative terminal from the battery.
Remove the socket from the assembly
by turning the socket count
Replacing license plate lamp (Bulb type)
Turn off vehicle and disconnect the
negative terminal from the battery.
Using a flat-blade screwdriver, gently
pry the lens cover from lamp housing
Remove the bulb by pulling it straigh
Replacing vanity mirror lamp (Bulb type)
WARNING
Interior lamps
Prior to working on the Interior lamps,
ensure that the "OFF" button is
depressed to avoid burning your fingers
or receiving an electric shock.
Turn off v
SEE MORE:
Yaw-rate and Lateral G Sensor | ESC OFF Switch
Description and Operation
Description
When the vehicle is turning with respect to a vertical axis the yaw rate sensor detects the yaw rate electronically by the vibration change of plate fork inside the yaw rate sensor.
If yaw velocity reaches the specific velocity after it detects the veh
Side body panel
Front inner pillar assembly
Quarter inner panel assembly
Side outer rear extension assembly
Quarter outer panel assembly
Center outer pillar assembly
Pillar outer panel assembly
Side assembly outer panel
Center floor panel
Front seat cross rear member assembly
Center floo
Content
- Home
- Kia Sportage - Fifth generation (NQ5) - (2022-2026) - Owner's Manual
- Kia Sportage - Second generation (JEKM) (2005-2015) - Body Workshop Manual
- Kia Sportage Third generation (SL) - (2011-2016) - Service and Repair Manual
- Sitemap
- Top articles
