Kia Sportage: Rear Washer Switch | Rear Washer Motor
Repair procedures
Inspection
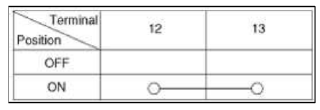
Check for continuity between the terminals while operating the wiper and washer switch. If it is not normal condition, replace wiper and washer switch.

Rear Wiper Switch
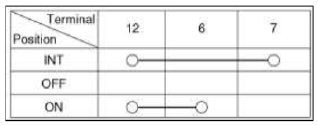
Rear Washer Switch
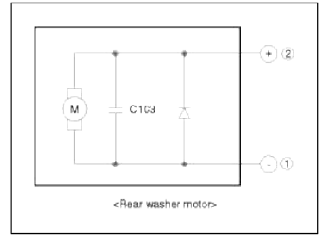
Rear Washer Motor
Repair procedures
Inspection
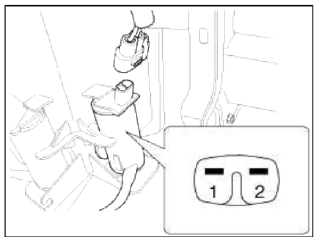
1. With the washer motor connected to the reservoir tank, fill the reservoir tank with water.
NOTE
Before filling the reservoir tank with water, check the filter for foreign material or contamination. If necessary, clean the filter.
2. Remove the front bumper cover.
(Refer to the BD group - "Front bumper")
3. Connect positive (+) and negative (-) battery cables to terminals 2 and 1 respectively to see that the washer motor runs and water is pumped.
4. Check that the motor operates normally.
Replace the motor if it operates abnormally.
- GND
- Washer (+)
READ NEXT:
 Components and ComponentsLocation | Description and Operation
Components Location
[ECM]
-
OEC (+)
-
-
-
-
OEC (-)
GND
Reverse signal
IGN (+)
[Reverse Display]
Camera power (-)
OEC
SEE MORE:
Blind-Spot Collision-Avoidance Assist malfunction and
limitations
Check Blind-Spot Safety system
When Blind-Spot Collision-Avoidance
Assist is not working properly, the warning message will appear on the cluster
for several seconds, and the master
warning light ( ) will appear. Have
Blind-Spot Collision-Avoidance Assist be
inspected by an authorized
Engine Oil
Repair procedures
Oil And Filter Replacement
CAUTION
Prolonged and repeated contact with mineral oil will result in the
removal of natural fats from the skin, leading to
dryness, irritation and dermatitis. In addition, used engine oil contains
potentially harmful contaminants which
m
Content
- Home
- Kia Sportage - Fifth generation (NQ5) - (2022-2026) - Owner's Manual
- Kia Sportage - Second generation (JEKM) (2005-2015) - Body Workshop Manual
- Kia Sportage Third generation (SL) - (2011-2016) - Service and Repair Manual
- Sitemap
- Top articles
