Kia Sportage: Seat Belt Pretensioner
Description and Operation
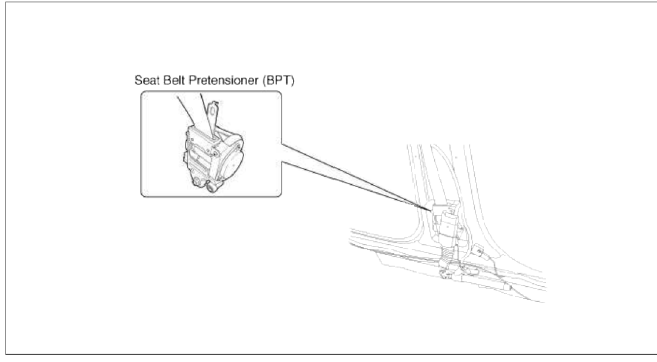
Description
The Seat Belt Pretensioners (BPT) are installed inside Center Pillar (LH & RH). When a vehicle crashes with a certain degree of frontal impact, the pretensioner seat belt helps to reduce the severity of injury to the front seat occupants by refracting the seat belt webbing. This prevents the front occupants from thrusting forward and hitting the steering wheel or the instrument panel when the vehicle crashes.
CAUTION
Never attempt to measure the circuit resistance of the Seat Belt Pretensioner (BPT) even if you are using the specified tester. If the circuit resistance is measured with a tester, the pretensioner will be ignited accidentally. This will result in serious personal injury.
Components and Components Location
Components
Repair procedures
Removal
1. Disconnect the battery negative cable, and wait for at least three minutes before beginning work.
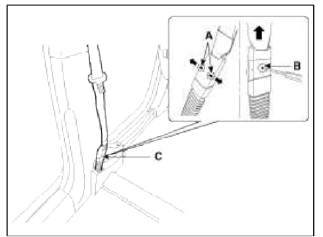
2. To remove the seat belt anchor pretensioner (C), keep on pushing the lock pins (A) as arrow direction. And then remove the seat belt after pushing the lock pin (B).

3. Remove the following parts. (Refer to the Body group- Interior trim)
- Door scuff trim
- Center pillar trim
4. Remove the upper anchor bolt.
5. Disconnect the seat belt pretensioner connector (A).
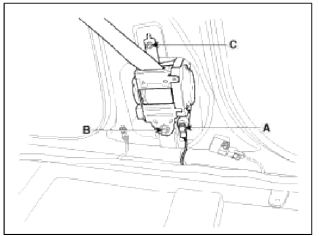
6. Loosen the seat belt pretensioner mounting bolt (B, C) and remove the seat belt pretensioner.
Installation
1. Remove the ignition key from the vehicle.
2. Disconnect the battery negative cable and wait for at least three minutes.
3. Install the seat belt pretensioner (BPT) with a bolt.
Tightening torque: Bolt B: 39.2 ~ 53.9 N.m (4.0 ~ 5.5 kgf.m, 28.9 ~ 39.8 lb-ft)
4. Connect the seat belt pretensioner (BPT) connector.
5. Install the upper anchor bolts.
Tightening torque: 39.2 ~ 53.9 N.m (4.0 ~ 5.5 kgf.m, 28.9 ~ 39.8 lb-ft)
6. Install the following parts. (Refer to the Body group- Interior trim)
- Center pillar trim
- Door scuff trim
7. Insert the seat belt to the anchor pretensioner.
8. Reconnect the battery negative cable.
9. After installing the seat belt pretensioner (BPT), confirm proper system operation:
- Turn the ignition switch ON: the SRS indicator light should be turned on for about six seconds and then go off.
Anchor Pretensioner
Description and Operation
Description
Anchor pretensioner operates as well as belt Pretensioner at the same time. If it gets into its deploy condition after a collision. It is located at near anchor on front seat and it is an equipment to make up for the existing short stroke.
Anchor pretensioner is supported by two cables and it is an auxiliary equipment to prevent a driver from breaking away doubly as seat belt is being pulled toward anchor side after a collision.
CAUTION
Never measure resistance of anchor pretensioner directly, current of measuring device may cause unexpected airbag deploy.
Repair procedures
Removal
1. Disconnect the battery negative cable, and wait for at least three minutes before beginning work.
2. To remove the seat belt anchor pretensioner (C), keep on pushing the lock pins (A) as arrow direction. And then remove the seat belt after pushing the lock pin (B).
3. Remove the following parts. (Refer to the Body group-interior trim)
- Door scuff trim
- Center pillar trim
4. Disconnect the anchor pretensioner connector (A).
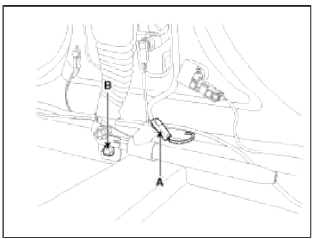
5. Loosen the anchor pretensioner mounting bolt (B) and remove the anchor pretensioner
Installation
1. Remove ignition key from the vehicle.
2. Disconnect the negative (-) cable from battery and wait for at least three minutes.
3. Install the anchor pretensioner with a bolt.
Tightening torque: 39.2 ~ 53.9 N.m (4.0 ~ 5.5 kgf.m, 28.9 ~ 39.8 lb-ft)
4. Connect the anchor pretensioner connector.
5. Install the following parts. (Refer to the body group - Interior trim)
- Center pillar trim
- Door scuff trim
6. Insert the seat belt to the anchor pretensioner.
NOTE
Make sure the lock pin is connected in properly.
7. Reconnect the battery negative cable.
8. After installing the anchor pretensioner, confirm proper system operation:
- Turn the ignition switch ON: the SRS indicator light should be turned on for about six seconds and then go off.
READ NEXT:
 General Information
Specifications
Specifications
Tightening Torques
Special Service Tools
Special Service Tools
SEE MORE:
Occupant Detection System (ODS)
Your vehicle is equipped with an Occupant
Detection System (ODS) in the front
passenger's seat.
The ODS is
designed to detect the presence
of a properly-seated front passenger
and determine if the passenger's
front air bag should be enabled (may
inflate) or not. Only the front pass
Ultrasonic Sensor
Components and
Components Location
Components Location
Repair procedures
Removal
1. Lift up the vehicle.
(Refer to GI group - "Lift and support points")
2. Remove the rear bumper.
(Refer to the BD group - "Rear bumper")
3. Pull out the sensor by opening the s
Content
- Home
- Kia Sportage - Fifth generation (NQ5) - (2022-2026) - Owner's Manual
- Kia Sportage - Second generation (JEKM) (2005-2015) - Body Workshop Manual
- Kia Sportage Third generation (SL) - (2011-2016) - Service and Repair Manual
- Sitemap
- Top articles
