Kia Sportage: Assembly
Measuring dimensions before welding
When assembling a new part, assemble it according to the body dimensions given in Section 31, and start welding after checking the gaps with nearby parts.
Caution when welding
The number of welding points should be determined based on the criteria below:
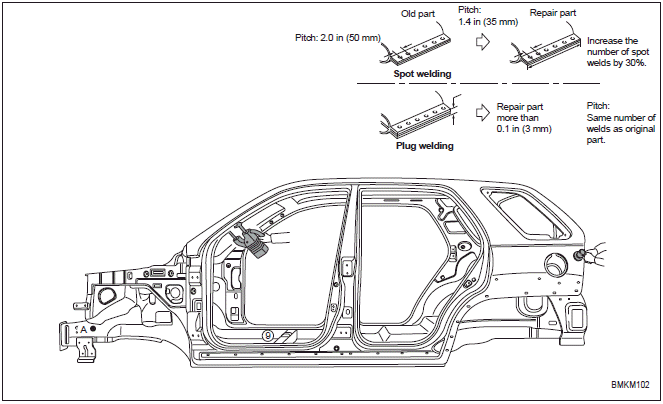
Caution when spot welding
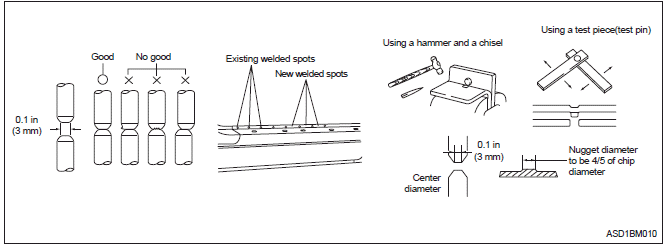
- The tip of the spot welding machine should be maintained to a minimum of 0.1 in (3 mm) because it greatly affects welding strength. When possible, spot welding should be done between the existing spot welded points.
- Before and after spot welding, weld a test piece (test pin) of the same material as the body panel, and check the welding strength.
READ NEXT:
 Rustproof treatment after assembly
Body sealing
Apply body sealer where necessary.
Applying rustproof material
Apply rustproofing material (wax, oil, etc.) behind welded area.
Applying undercoat
Apply undercoat on the body where
Vehicle lift (2-Support type) and safety stand positions
1. Place the lift blocks under the support points as shown in the
illustration.
2. Raise the hoist a few inches and rock the vehicle to be sure it is firmly
supported.
3. Raise the hoist to fu
SEE MORE:
Forward Collision-Avoidance Assist settings
Setting features
Forward Safety
Driver Assistance
Forward Safety
Active Assist
Warning Only
Off
With the vehicle on, select Settings?
Driver Assistance ? Forward Safety
from the User Settings menu or select
Settings ? Vehicle ?Driver Assistance
? Forward Safety from t
Shift Lever
Components and Components Location
Components
Shift lever knob & boots
assembly
Shift lever assembly
Control cable assembly
Manual control lever (T/M side)
Repair procedures
Removal
Shift Lever Assembly Replacement
1. Remove the center console assembly. (Refer to "
Content
- Home
- Kia Sportage - Fifth generation (NQ5) - (2022-2026) - Owner's Manual
- Kia Sportage - Second generation (JEKM) (2005-2015) - Body Workshop Manual
- Kia Sportage Third generation (SL) - (2011-2016) - Service and Repair Manual
- Sitemap
- Top articles
