Kia Sportage: Changing tires
WARNING
A vehicle can slip or roll off of a jack causing serious injury or death to you or those nearby. Take the following safety precautions:
- Never place any portion of your body under a vehicle that is supported by a jack.
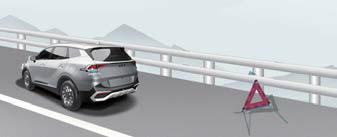
- NEVER attempt to change a tire in the lane of traffic. ALWAYS move the vehicle completely off the road on level, firm ground away from traffic before trying to change a tire. If you cannot find a level, firm place off the road, call a towing service for assistance.
- Be sure to use the jack provided with the vehicle.
- ALWAYS place the jack on the designated jacking positions on the vehicle and NEVER on the bumpers or any other part of the vehicle for jacking support.
- Do not start or run the engine while the vehicle is on the jack.
- Do not allow anyone to remain in the vehicle while it is on the jack.
- Keep children away from the road and the vehicle.
- Park on a level surface and apply the parking brake firmly.
- Shift the gear to P (Park), apply the parking brake, and turn the engine OFF.
- Activate the hazard warning flasher.
- Remove the wheel lug nut wrench, jack, jack handle, and spare tire from the vehicle.
- Block both the front and rear of wheel that is diagonally opposite the jack position.

WARNING
Jack location
To reduce the possibility of injury, be sure to only use the jack provided with the vehicle in the correct jack position; never use any other part of the vehicle for jack support.
WARNING
Changing a tire
- To prevent vehicle movement while changing a tire, always set the parking brake fully, and always block the wheel diagonally, opposite the wheel being changed.
- We recommend that the wheels of the vehicle be blocked, and that no person remain in a vehicle that is being jacked.
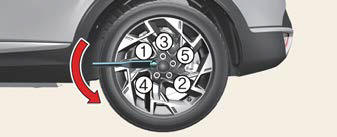
- Loosen the wheel lug nuts counterclockwise one turn each, but do not remove any nut until the tire has been raised off the ground.
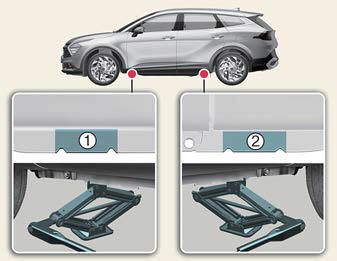
- Place the jack at the front (1) or rear (2) jacking position closest to the tire you are changing. Place the jack at the designated locations under the frame. The jacking positions are plates welded to the frame with two tabs and a raised dot to index with the jack.
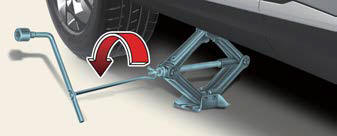
- Insert the jack handle into the jack
and turn it clockwise, raising the vehicle
until the tire just clears the ground.
This measurement is approximately 1.2 inches (30 mm). Before removing the wheel lug nuts, make sure the vehicle is stable and that there is no chance for movement or slippage.
- Loosen the wheel nuts and remove
them with your fingers. Slide the
wheel off the studs and lay it flat so it
cannot roll away. To put the wheel on
the hub, pick up the spare tire, line up
the holes with the studs and slide the
wheel onto them.
If this is difficult, tip the wheel slightly and get the top hole in the wheel lined up with the top stud. Then jiggle the wheel back and forth until the wheel can be slid over the other studs.
- To reinstall the wheel, hold it on the studs, put the wheel nuts on the studs and tighten them finger tight. Jiggle the tire to be sure it is completely seated, then tighten the nuts as much as possible with your fingers again.
- Lower the vehicle to the ground by turning the wheel nut wrench counterclockwise.
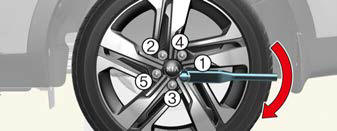
Then position the wrench as shown in the drawing and tighten the wheel nuts. Be sure the socket is seated completely over the nut. Do not stand on the wrench handle or use an extension pipe over the wrench handle.
Go around the wheel tightening every other nut until they are all tight.
Then double-check each nut for tightness.
After changing wheels, have the system checked by an authorized Kia dealer.
WARNING
Installing a wheel
- When you install a wheel, always remove any corrosion, dirt or foreign materials present on the mounting surfaces of the wheel or the surface of the wheel hub, brake drum or brake disc that contacts the wheel. Make sure to secure any fasteners that attach the rotor to the hub so they do not interfere with the mounting surfaces of the wheel. Installing wheels without correct metal-to-metal contact at the wheel mounting surfaces can cause the wheel nuts to loosen and the wheel to come off while your vehicle is in motion, resulting in loss of vehicle control, personal injury or death.
- Make sure the wheel makes good
contact with the hub when installed. If
the contact of the mounting surface
between the wheel and hub is not
good, the wheel nuts could come
loose and cause the loss of a wheel.
Loss of a wheel may result in loss of control of the vehicle.
Wheel nut tightening torque:
Steel wheel & aluminum alloy wheel: 79 ~ 94 lbf*ft (11 ~ 13 kgf*m) If you have a tire gauge, remove the valve cap and check the air pressure. If the pressure is lower than recommended, drive slowly to the nearest service station and inflate to the correct pressure. If it is too high, adjust it until it is correct. Always reinstall the valve cap after checking or adjusting tire pressure.
If the cap is not replaced, air may leak from the tire. If you lose a valve cap, buy another and install it as soon as possible.
After you have changed wheels, always secure the flat tire in its place and return the jack and tools to their proper storage locations.
CAUTION
Reusing lug nuts
Make certain during wheel removal that the same nuts that were removed are reinstalled - or, if replaced, that nuts with metric threads and the same chamfer configuration are used. Your vehicle has metric threads on the wheel studs and nuts. Installation of a non-metric thread nut on a metric stud will not secure the wheel to the hub properly and will damage the stud so that it must be replaced.
Note that most lug nuts do not have metric threads. Be sure to use extreme care in checking for thread style before installing aftermarket lug nuts or wheels.
If in doubt, consult an authorized Kia dealer.
WARNING
Wheel studs
If the studs are damaged, they may lose their ability to retain the wheel. This could lead to the loss of the wheel and a collision resulting in serious injuries.
WARNING
Never use oil or grease on bolts or nuts because the nuts might come loose. The vehicle's wheel could fall off, causing a crash.
READ NEXT:
 Important - use of compact spare tire
Your vehicle is equipped with a compact
spare tire. This compact spare tire takes
up less space than a regular-size tire.
This tire is smaller than a conventional
tire and is designed for tempor
Towing
Towing service
If emergency towing is necessary, have
it done by authorized Kia dealer or a
commercial tow-truck service.
Proper lifting and towing procedures are
necessary to prevent damage to
SEE MORE:
Servicing The Electrical System
1. Prior to servicing the electrical system, be sure to turn off the ignition
switch and disconnect the battery ground
cable.
NOTE
In the course of MFI or ELC system diagnosis, when the battery cable is
removed, any diagnostic double
code retained by the computer will be cleared. There fore,
Operating precautions for catalytic
converters
WARNING
Fire
Do not park, idle or drive the vehicle
over or near flammable objects, such
as grass, vegetation, paper, leaves,
etc. A hot exhaust system can ignite
flammable items under your vehicle.
Also, do not remove the heat sink
around the exhaust system, do not
seal the botto
Content
- Home
- Kia Sportage - Fifth generation (NQ5) - (2022-2026) - Owner's Manual
- Kia Sportage - Second generation (JEKM) (2005-2015) - Body Workshop Manual
- Kia Sportage Third generation (SL) - (2011-2016) - Service and Repair Manual
- Sitemap
- Top articles
