Kia Sportage: Mirror | Cowl Top Cover
Repair procedures
Replacement
Outside Rear View Mirror Assembly Replacement
CAUTION
- When prying with a flat-tip screwdriver, wrap it with protective tape, and apply protective tape around the related parts, to prevent damage.
- Put on gloves to protect your hands.
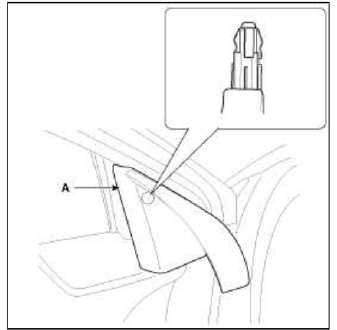
1. Remove the front door quadrant inner cover (A).
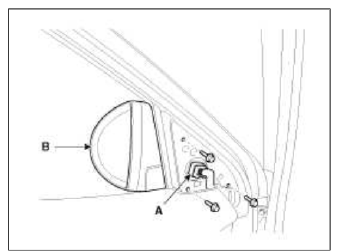
2. Disconnect the connector (A).
3. After loosening the mounting bolts, then remove the outside rear view mirror (B).
Tightening torque: 6.9 ~ 10.8 N.m (0.7 ~ 1.1 kgf.m, 5.1 ~ 8.0 lb-ft)
4. Installation is the reverse of removal.
Inside Rear view Mirror Replacement
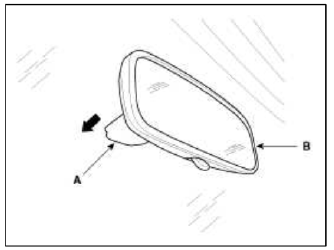
1. Push the inside rear view mirror base (A) down to remove to inside rear view mirror assembly (B).
2. Installation is the reverse of removal.
ECM Mirror Replacement
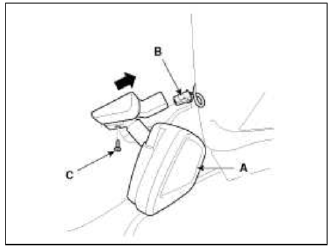
1. Remove the ECM mirror cover (A).
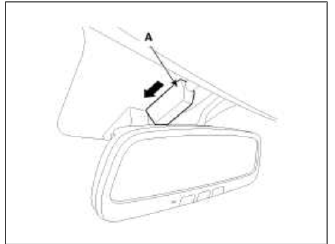
2. Disconnect the ECM mirror connector (B).
3. Loosen the mounting screw (C), push the ECM mirror base up to remove the ECM mirror assembly (A).
4. Installation is the reverse of removal.
NOTE
Make sure the connector are connected in properly.
Cowl Top Cover
Repair procedures
Replacement
1. Remove the wiper arm cover (B).
2. After loosening the mounting nuts, then remove the wiper arm (A).
Tightening torque: 22 .6 ~ 26.5 N.m (2.3 ~ 2.7 kgf.m, 16.6 ~ 19.5 lb-ft)
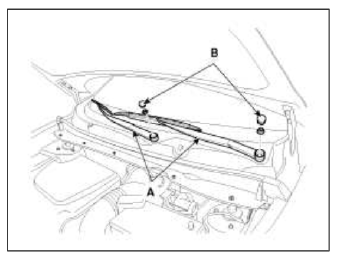
3. Remove the washer nozzle hose (B).
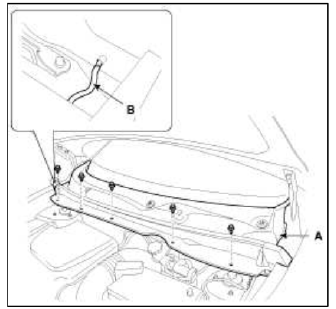
4. Detach the clips, then remove the cowl top cover (A).
5. Installation is the reverse of removal.
NOTE
- Replace any damage clips.
READ NEXT:
 Console
Components and Components Location
Components
[M/T]
Floor console assembly
Floor console tray
Console upper cover [5 speed M/T]
Console upper cover [6 speed M/T]
Console storage
SEE MORE:
 Roof Trim
Components and Components Location
Components
Roof trim
Sunvisor [Driver's]
Sunvisor [Passenger's]
Components [Panoramaroof]
Roof trim
Sunvisor [Driver's]
Sunvisor [Passenger's]
Repair procedures
Replacement
Sunvisor Replacement
CAUTION
 Components of the Tire Mobility Kit
Speed-restriction label
Sealant bottle and label with speed restriction
Filling hose from sealant bottle to wheel
Connectors and cable for the power outlet direct connection
Holder for the sealant bottle
Compressor
ON/OFF switch
Pressure gauge for displaying the tire inflation p
Content
- Home
- Kia Sportage - Fifth generation (NQ5) - (2022-2026) - Owner's Manual
- Kia Sportage - Second generation (JEKM) (2005-2015) - Body Workshop Manual
- Kia Sportage Third generation (SL) - (2011-2016) - Service and Repair Manual
- Sitemap
- Top articles