Kia Sportage: Operating front fog light
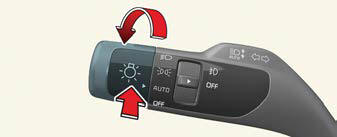
Operating front fog light (if equipped)
Fog lights are designed to provide improved visibility when visibility is poor due to fog, rain or snow, etc.
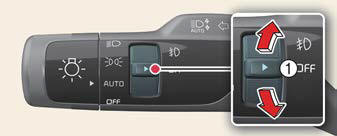
The fog lights will turn on when the fog light switch (1) is turned to the on position after the headlamp is turned on.
To turn off the fog lights:
- Turn the fog light switch (1) to the ON position.
CAUTION
When in operation, the fog lights consume large amounts of vehicle electrical power. Only use the fog lights when visibility is poor.
High Beam Assist (HBA)
High Beam Assist is a function that automatically adjusts the headlamp range (switches between high beam and low beam) depending on the brightness of detected vehicles and certain road conditions.
Detecting sensor

Front view camera
The front view camera is used as a detecting sensor to detect ambient light and brightness while driving.
Refer to the picture above for the detailed location of the detecting sensor.
NOTICE
- Always keep the front view camera in good condition to maintain optimal performance of High Beam Assist.
- For more details on the precautions of the front view camera, refer to "Forward Collision-Avoidance Assist (FCA) (Front Camera Only) (if equipped)" and "Forward Collision- Avoidance Assist (FCA) (Sensor Fusion) (if equipped)" there should be some direction after to.
READ NEXT:
 High Beam Assist (HBA)
A: Vehicle Settings
Lights
High Beam Assist
With the ENGINE START/STOP button in
the ON position, select 'Lights ? High
Beam Assist' from the Settings menu to
turn on High
Malfunction and limitations
Malfunction
A: Check High Beam Assist (HBA) system
When High Beam Assist is not working
properly, the 'Check High Beam Assist
(HBA) system' warning message will
appear and warning lig
Wipers and washers
The wipers and washers remove foreign
substances from the windshield and rear
window, helping to maintain visibility.
A: Wiper speed control
MIST - Single wipe
OFF - Off
INT - Inter
SEE MORE:
Washer fluid
Checking the washer fluid level
The reservoir is translucent so that you
can check the level with a quick visual
inspection.
Check the fluid level in the washer
fluid reservoir and add fluid if necessary.
Plain water may be used if
washer fluid is not available.
However, use was
SS-B Solenoid Valve (ON/OFF)
Description and Operation
Description
SS-B solenoid valve is attached to the valve body and is an on/off solenoid
valve that is used to change gears. SS-B
Solenoid valve (ON/OFF) is installed at valve body.
Specifications
Specifications
ON/OFF Solenoid Valve (SS-A, SS-B)
Contr
Content
- Home
- Kia Sportage - Fifth generation (NQ5) - (2022-2026) - Owner's Manual
- Kia Sportage - Second generation (JEKM) (2005-2015) - Body Workshop Manual
- Kia Sportage Third generation (SL) - (2011-2016) - Service and Repair Manual
- Sitemap
- Top articles
