Kia Sportage: Power Window Motor | Power Window Switch
Repair procedures
Inspection
Front Power Window Motor
1. Remove (-) negative battery terminal.
2. Remove the front door trim.
(Refer to the BD group - "Front door")
3. Disconnect the connector from the motor.
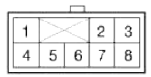
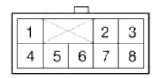
(A : Safety, Ð’ : Standard)
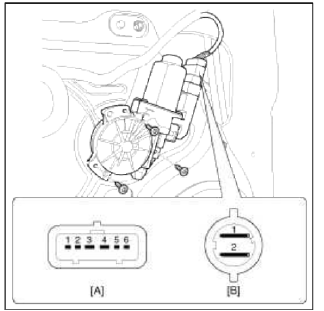
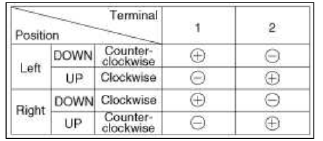
4. Connect the motor terminals directly to battery voltage (12V) and check that the motor operates smoothly. Next, reverse the polarity and check that the motor operates smoothly in the reverse direction. If the operation is abnormal, replace the motor.
[Standard]
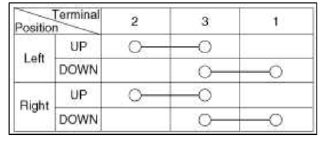
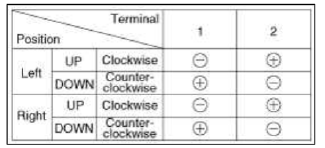
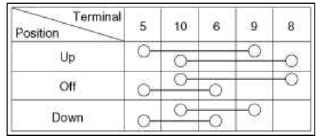
5. Connect the terminal No.2 and No.3 to battery voltage (12V) and check that the motor operates smoothly when connecting the terminals below.
[Safety]
Rear Power Window Motor
1. Remove (-) negative battery terminal.
2. Remove the rear door trim.
(Refer to the BD group - "Rear door")
3. Disconnect the connector from the motor.
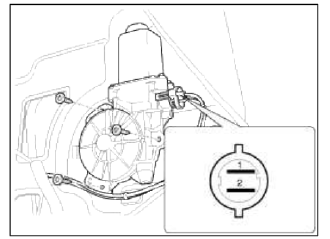
4. Connect the motor terminals directly to battery voltage (12V) and check that the motor operates smoothly. Next, reverse the polarity and check that the motor operates smoothly in the reverse direction. If the operation is abnormal, replace the motor.
Power Window Switch
Components and Components Location
Components
Power Window Main Switch
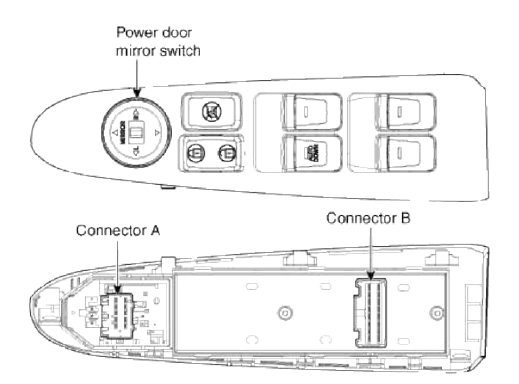
 Connector A
- -
- -
- -
- Battery
- GND
- ACC
- -
- Driver door mirror motor (vertical)
- Driver door mirror motor (horizontal)
- Common
- Assist door mirror motor (horizontal)
- Assist door mirror motor (vertical)
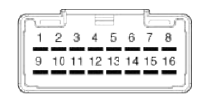 Connector Ð’
- Assist window switch up
- Assist window switch down
- Illumination
- -
- Door unlock
- Driver switch Auto
- Driver window switch up
- Driver window switch down
- Battery (+) R
- Rear right window switch up
- Rear right window switch down
- GND
- Door lock
- Rear left window switch up
- Rear left window switch down
- Battery (+) L
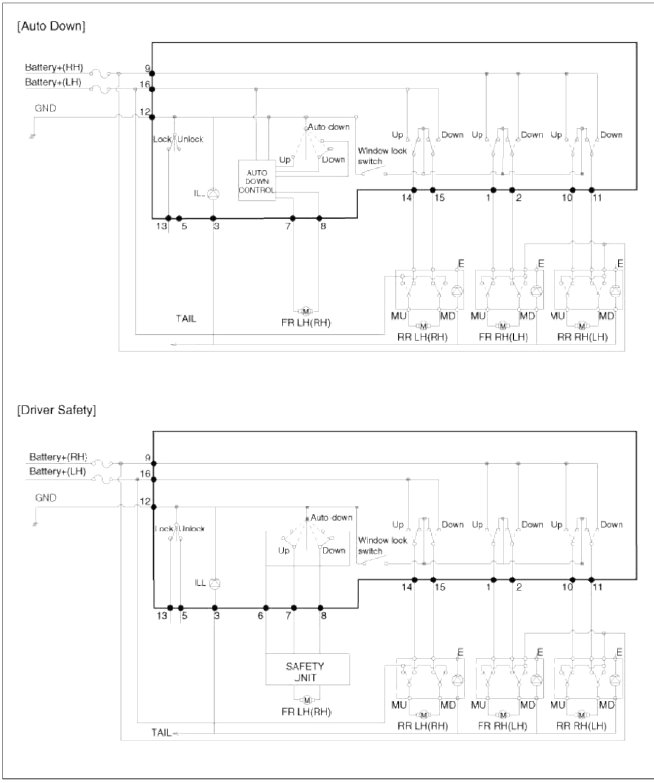
[Auto Down] / [Driver Safety]
Passenger Power Window Switch
[Power Window Lock]
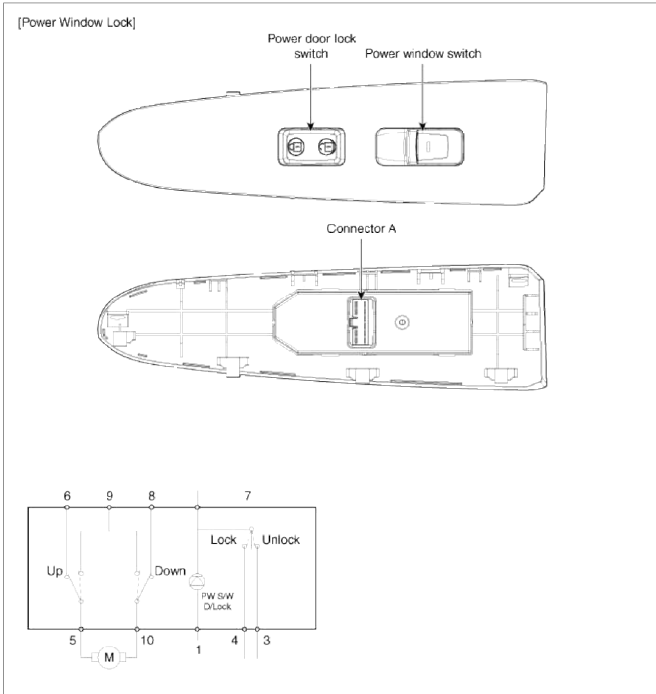
 Connector A
- Connector A
- Tail lamp
- -
- Door unlock
- Door lock
- Power window motor up
- Power window switch up
- GND
- Power window switch down
- Battery(+)
- Power window motor down
[Power Window Only]
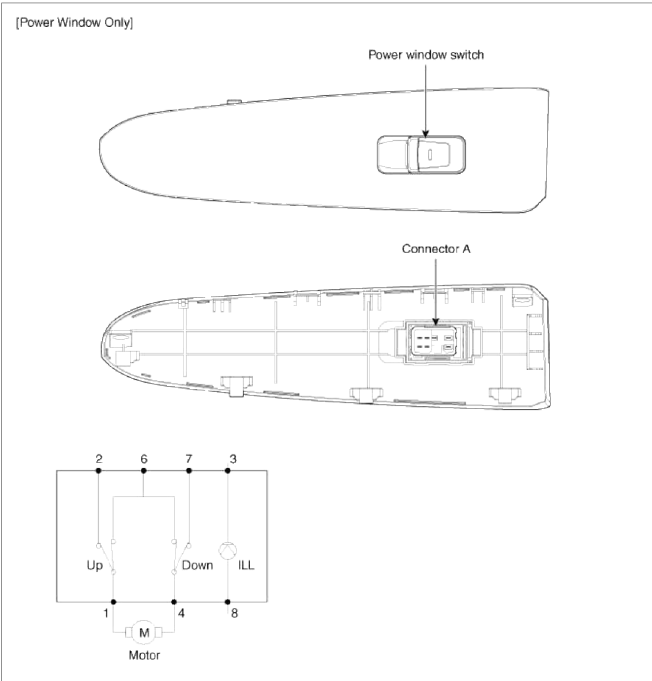
 Connector A
- Power window motor up
- Power window switch up
- GND
- Power window motor down
- -
- Battery (-)
- Power window switch down
- Tail lamp
Rear Power Window Switch
[Power Window]
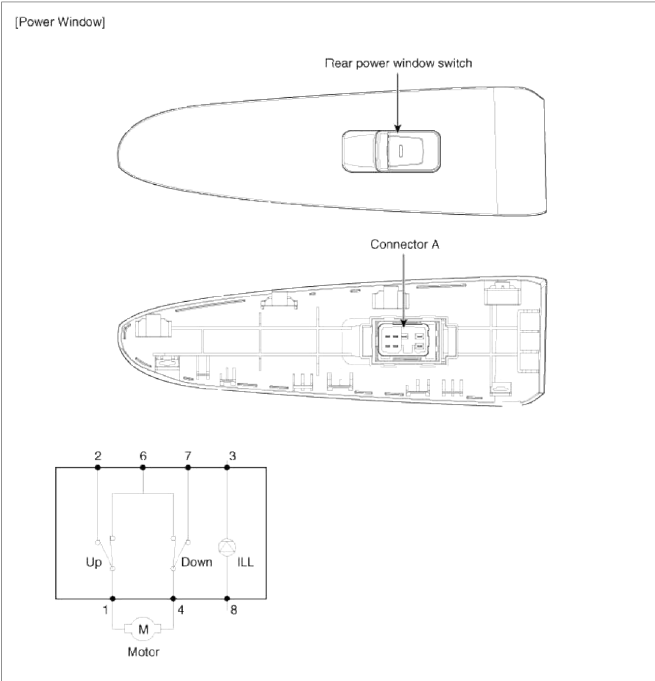
 Connector A
- Power window motor up
- Power window switch up
- GND
- Power window motor down
- Battery (+)
- -
- Power window switch down
- Tail lamp
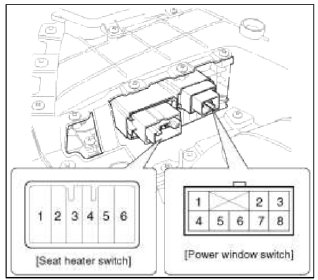
[Seat Heater + Power Window]
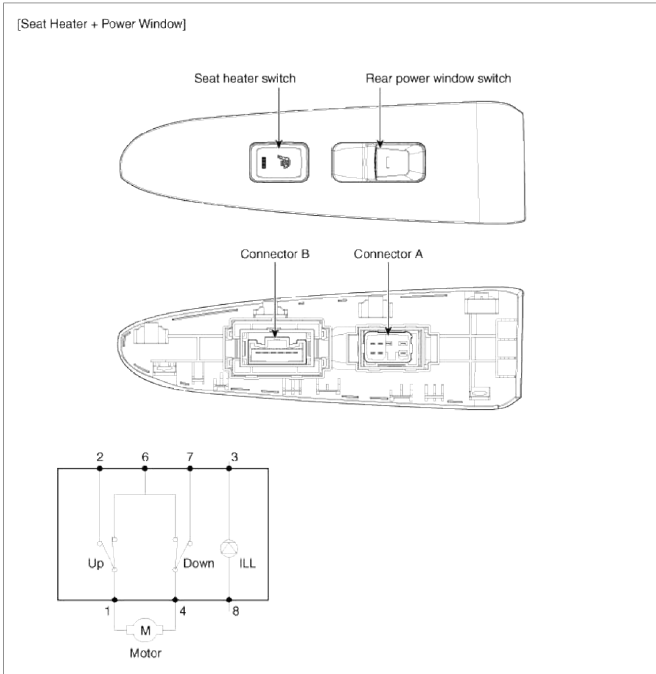
 Connector A
- Power window motor up
- Power window switch up
- GND
- Power window motor down
- Battery (+)
- -
- Power window switch down
- Tail lamp
Repair procedures
Inspection
Main Power Window Switch Inspection
1. Disconnect the negative (-) battery terminal.
2. Remove the front door trim and power window switch.
(Refer to the BD group - "Front door")
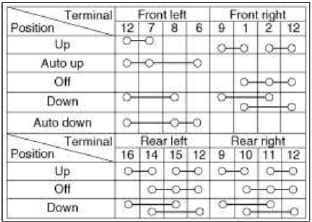
3. Check for continuity between the terminals in each switch position according to the table. If the continuity condition is not normal, replace the switch.
![[Driver Auto Up/Down]](images/books/1921/12/index%2052.png)
[Driver Auto Up/Down]
Passenger Power Window Switch Inspection
1. Disconnect the negative (-) battery terminal.
2. Remove the front door trim and power window switch.
(Refer to the BD group - "Front door")
3. Check for continuity between the terminals in each switch position according to the table. If the continuity condition is not normal, replace the switch.
![[General]](images/books/1921/12/index%2054.png)
[General]
![[Power Door Lock]](images/books/1921/12/index%2055.png)
[Power Door Lock]
Rear Power Window Switch Inspection
1. Disconnect the negative (-) battery terminal.
2. Remove the rear door trim.
(Refer to the BD group - "Rear door")
3. Remove the rear power window switch module.
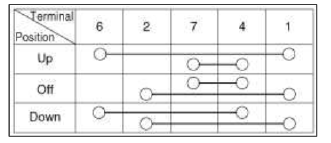
4. Check for continuity between the terminals in each switch position according to the table. If the continuity condition is not normal, replace the switch.
[General]
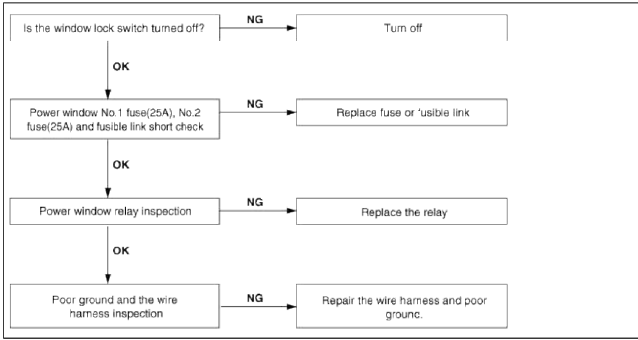
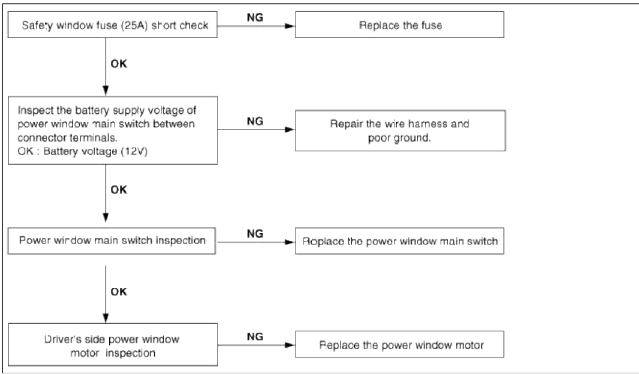
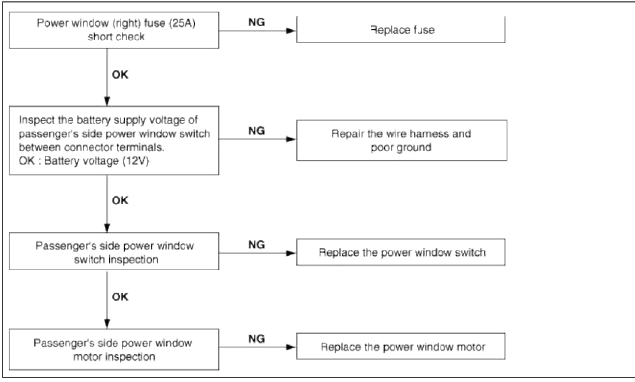
Troubleshooting
Troubleshooting
1. No windows operate from the main switch on the driver's door.
2. Driver's side window does not operate.
3. Passenger's side window does not operate.
READ NEXT:
 Components and Components Location, Description and Operation | Repair procedures | Windshield Deicer Switch
Components and Components Location
Component Location
Windshield deicer relay
Windshield deicer switch
Windshield deicer
Deicer connector
Description and Operation
SEE MORE:
Outside rear view mirror
Your vehicle is equipped with both left-hand and right-hand outside rear view
mirrors.
Be sure to adjust the mirror angles before driving.
The mirrors can be adjusted remotely with the control levers or remote switch,
depending on the type of mirror control installed. The mirror heads can b
Seat belt - Driver's 3-point system with emergency locking retractor
The following explains how to fasten and
adjust the driver's seat belt.
Fastening the your seat belt:
Pull it out of the retractor
and insert
the metal tab (1) into the buckle (2).
There will be an audible "click" when
the tab locks into the buckle.
WARNING
You sh
Content
- Home
- Kia Sportage - Fifth generation (NQ5) - (2022-2026) - Owner's Manual
- Kia Sportage - Second generation (JEKM) (2005-2015) - Body Workshop Manual
- Kia Sportage Third generation (SL) - (2011-2016) - Service and Repair Manual
- Sitemap
- Top articles
