Kia Sportage: Side Impact Sensor (SIS)
Description and Operation
Description
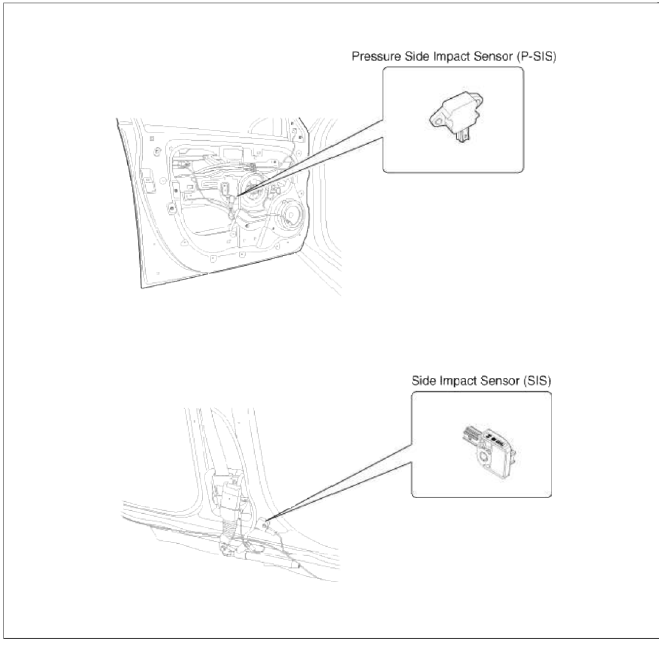
Side Impact Sensor (SIS) system consists of two P-SIS which are installed at each center of the front door module (LH and RH) and two SIS which are installed at each center pillar nearby (LH and RH).
Side Pressure Sensor is also called P-SIS because that detects pressure due to collision at its mounting location.
Side Impact Sensor is also called A-SIS because that detects acceleration.
SRSCM decides deployment or not of the airbag and the time of deployment through the collision signal of SIS when the collision occurred.
Components and Components Location
Components
Repair procedures
Removal
Pressure Side Impact Sensor
CAUTION
- Removal of the airbag must be performed according to the precautions/procedures described previously.
- Before disconnecting the side impact sensor connector(s), disconnect the side airbag connector(s).
- Do not turn the ignition switch ON and do not connect the battery cable while replacing the side impact sensor.
1. Disconnect the battery negative cable, and wait for at least three minutes before beginning work.
2. Remove the front door trim. (Refer to the Body group- Front door)
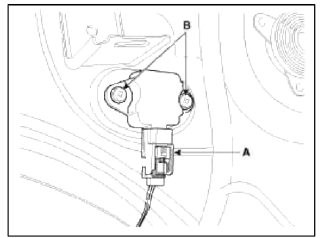
3. Disconnect the front side impact sensor connector (A) and remove the front side impact sensor mounting screws (B).
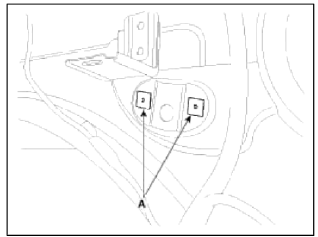
4. Remove the screw grommets (A).
Side Impact Sensor
1. Disconnect the battery negative cable and wait for at least three minutes before beginning work.
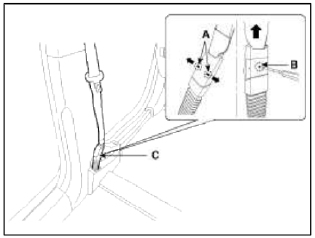
2. To remove the seat belt anchor pretensioner (C), keep on pushing the lock pins (A) as arrow direction. And then remove the seat belt after pushing the lock pin (B).
3. Remove the door scuff trim. (Refer to the Body group - Interior trim)
4. Remove the center pillar trim. (Refer to the Body group - Interior trim)
5. Disconnect the side impact sensor connector (A).
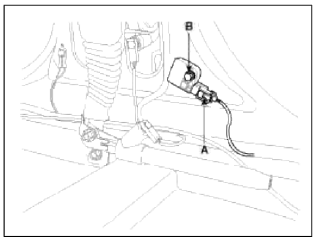
6. Loosen the side impact sensor mounting bolt (B) and remove the side impact sensor.
Installation
Pressure Side Impact Sensor
CAUTION
- Do not turn the ignition switch ON and do not connect the battery cable while replacing the side impact sensor.
1. Install the screw grommets (A).

CAUTION
- Do not reuse the screw grommets (A), whenever installing.
2. Install the new front side impact sensor with the screws then connect the pressure side impact sensor connector.
Tightening torque: 1.1 ~ 1.3 N.m (0.11 ~ 0.13 kgf.m, 0.7 ~ 1.0 lb-ft)
3. Install the front door trim. (Refer to the Body group- Front door)
4. Insert the seat belt to the anchor pretensioner.
NOTE
Make sure the lock pin is connected in properly.
5. Reconnect the battery negative cable.
6. After installing the front side impact sensor, confirm proper system operation:
- Turn the ignition switch ON: the SRS indicator light should be turned on for about six seconds and then go off.
CAUTION
- You must comply with the specified tightening torque because the Pressure - Side Impact Sensors (P-SIS) may be broken or the screw grommet may be rotated.
- Problems may occur in the durability of P-SIS or impact sensing performance may be depreciated if screw grommet is rotated.
- The door module must not be deformed because SRSCM judges a impact through the pressure sensor in the door module.
Side Impact Sensor
CAUTION
- Do not turn the ignition switch ON and do not connect the battery cable while replacing the side impact sensor.
1. Install the new side impact sensor with the bolt then connect the side impact sensor connector.
Tightening torque: 7.0 ~ 9.0 N.m (0.7 ~ 0.9 kgf.m, 5.1 ~ 6.6 lb-ft)
2. Install the center pillar trim (Refer to the Body group - Interior trim)
3. Install the door scuff trim. (Refer to the Body group - Interior trim)
4. Insert the seat belt to the anchor pretensioner.
5. Reconnect the battery negative cable.
6. After installing the Side Impact Sensor, confirm proper system operation:
- Turn the ignition switch ON: the SRS indicator light should be turned on for about six seconds and then go off.
READ NEXT:
 Seat Belt Buckle Switch (BS) | Passive Occupant Detection System (PODS)
Description and Operation
Description
The SRSCM shall monitor the status of the driver and front passenger seat belt buckle. The SRSCM provides one pin each for the driver and front passenger
SEE MORE:
Front Cross Member
Repair procedures
Replacement
1. Remove the front wheel & tire.
Tightening torque:
88.3 ~ 107.9N.m (9.0 ~ 11.0kgf.m, 65.1 ~ 79.6lb-ft)
CAUTION
Be careful not to damage to the hub bolts when removing the front wheel &
tire (A).
2. Disconnect the stabilizer link (B) from the f
Power outlet
The power outlet is designed to provide
power for mobile telephones or other
devices designed to operate with vehicle
electrical systems or other devices that
are compatible with the power outlet
and vehicle electrical system.
The devices should draw less than 15
amps with the vehicle on.
Content
- Home
- Kia Sportage - Fifth generation (NQ5) - (2022-2026) - Owner's Manual
- Kia Sportage - Second generation (JEKM) (2005-2015) - Body Workshop Manual
- Kia Sportage Third generation (SL) - (2011-2016) - Service and Repair Manual
- Sitemap
- Top articles
