Kia Sportage: Body Side Moldings
Repair procedures
Replacement
Roof Rack Replacement
CAUTION
- When prying with a flat-tip screwdriver, wrap it with protective tape, and apply protective tape around the related parts, to prevent damaged.
- Put on gloves to protect your hands.
- Take care not to scratch the body surface.
1. Using a screwdriver or remover, remove the roof rack cover (C).
2. Using a screwdriver or remover, remove the roof rack side rail cover (B).
3. After loosening the mounting nuts, then remove the roof rack (A).
Tightening torque: 3.9 ~ 4.4 N.m ( 0.4 ~ 0.45 kgf.m, 2.9 ~ 3.3 lb-ft)
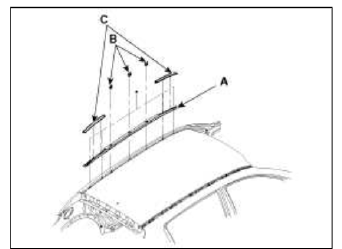
4. Installation is the reverse of removal.
NOTE
- Replace any damage clips.
Roof Rack Replacement [Panoramaroof]
CAUTION
- When prying with a flat-tip screwdriver, wrap it with protective tape, and apply protective tape around the related parts, to prevent damaged.
- Put on gloves to protect your hands.
- Take care not to scratch the body surface.
1. Using a screwdriver or remover, remove the roof rack side rail cover (B).
2. After loosening the mounting nuts, then remove the roof rack (A).
Tightening torque: 3.9 ~ 4.4 N.m ( 0.4 ~ 0.45 kgf.m, 2.9 ~ 3.3 lb-ft)
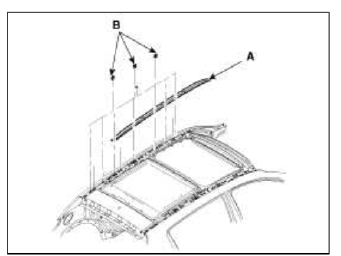
3. Installation is the reverse of removal.
NOTE
- Replace any damage clips.
Roof Molding Replacement
CAUTION
- When prying with a flat-tip screwdriver, wrap it with protective tape, and apply protective tape around the related parts, to prevent damaged.
- Put on gloves to protect your hands.
- Take care not to scratch the body surface.
1. Remove the roof rack.
2. Using a screwdriver or remover, remove the roof molding (A).
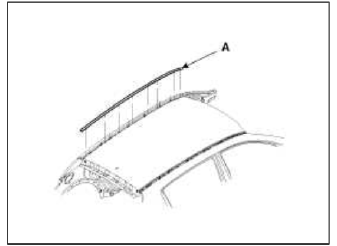
3. Installation is the reverse of removal.
NOTE
- Replace any damage clips.
Roof Molding Replacement [Panoramaroof]
CAUTION
- When prying with a flat-tip screwdriver, wrap it with protective tape, and apply protective tape around the related parts, to prevent damaged.
- Put on gloves to protect your hands.
- Take care not to scratch the body surface.
1. Remove the roof rack.
2. Using a screwdriver or remover, remove the roof molding (A).
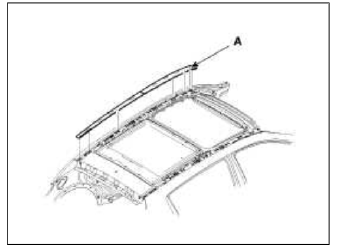
3. Installation is the reverse of removal.
NOTE
- Replace any damage clips.
Front Wheel Guard And Mud Guard Replacement
CAUTION
- When prying with a flat-tip screwdriver, wrap it with protective tape, and apply protective tape around the related parts, to prevent damaged.
- Put on gloves to protect your hands.
- Take care not to scratch the body surface.
1. Remove the front tire.
2. After loosening the mounting clips and screws, then remove the front wheel guard (A), mud guard (B).
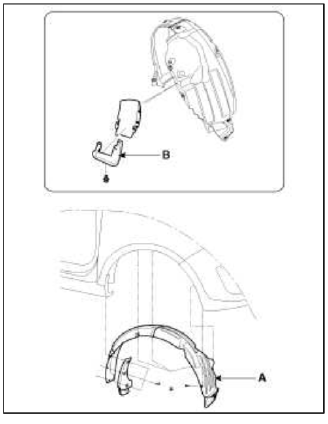
3. Installation is the reverse of removal.
NOTE
- Replace any damage clips.
CAUTION
- When prying with a flat-tip screwdriver, wrap it with protective tape, and apply protective tape around the related parts, to prevent damaged.
- Put on gloves to protect your hands.
- Take care not to scratch the body surface.
1. Remove the rear tire.
2. After loosening the mounting clips and nut, then remove the rear wheel guard (A) and mud guard (B).
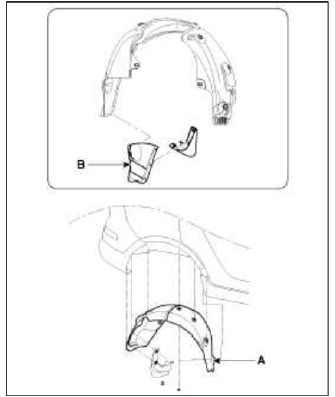
3. Installation is the reverse of removal.
NOTE
- Replace any damage clips.
Tail Gate Garnish Replacement
CAUTION
- When prying with a flat-tip screwdriver, wrap it with protective tape, and apply protective tape around the related parts, to prevent damaged.
- Put on gloves to protect your hands.
- Take care not to scratch the body surface
1. Remove the tail gate trim.
(Refer to the BD group - "Tail Gate")
2. Disconnect the connectors (A).
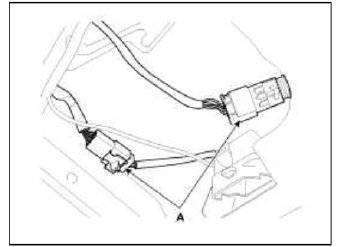
3. After loosening the mounting screws, then remove the tail gate garnish (A).
4. Installation is the reverse of removal.
NOTE
- Replace any damage clips.
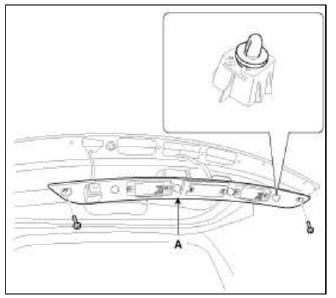
Rear Spoiler Replacement
CAUTION
- When prying with a flat-tip screwdriver, wrap it with protective tape, and apply protective tape around the related pails, to prevent damaged.
- Put on gloves to protect your hands.
- Take care not to scratch the body surface.
1. Remove the tail gate trim.
(Refer to the BD group - "Tail Gate")
2. Disconnect the washer nozzle (B).
3. After loosening the mounting nuts, then remove the rear spoiler (A).
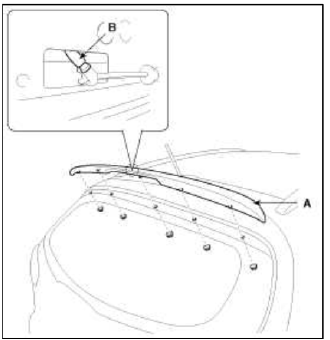
4. Installation is the reverse of removal.
NOTE
- Replace any damage clips.
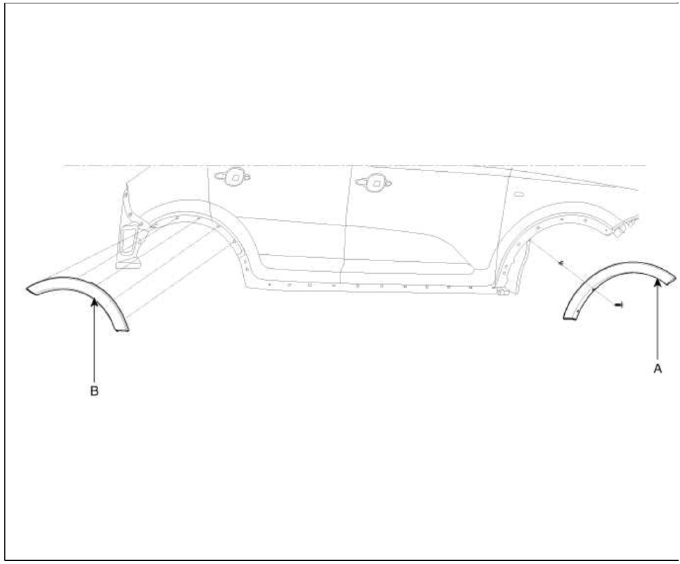
Fender Garnish Replacement
CAUTION
- When prying with a flat-tip screwdriver, wrap it with protective tape, and apply protective tape around the related parts, to prevent damaged.
- Put on gloves to protect your hands.
- Take care not to scratch the body surface.
1. Loosen the front fender garnish mounting screw.
2. Using a screwdriver or remover, remove the front fender garnish (A).
3. Using a screwdriver or remover, remove the rear fender garnish (B).
4. Installation is the reverse of removal.
NOTE
- Replace any damage clips.
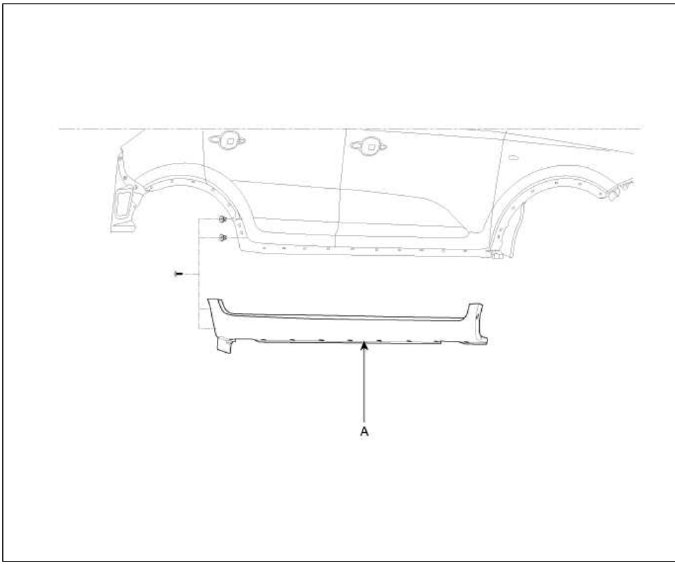
Side Sill Molding Replacement
CAUTION
- When prying with a flat-tip screwdriver, wrap it with protective tape, and apply protective tape around the related pails, to prevent damaged.
- Put on gloves to protect your hands.
- Take care not to scratch the body surface
1. Loosen the side sill molding mounting screws.
2. Using a screwdriver or remover, remove the side sill molding (A).
3. Installation is the reverse of removal.
NOTE
- Replace any damage clips.
READ NEXT:
 Panoramaroof
Components and Components Location
Components
Panoramaroof frame assembly
Movable glass assembly
Wind deflector assembly
Mechanism assembly
Impact bracket
Impact cross member
Mirror | Cowl Top Cover
Repair procedures
Replacement
Outside Rear View Mirror Assembly Replacement
CAUTION
When prying with a flat-tip screwdriver, wrap it with protective tape, and apply protective tape a
SEE MORE:
System operation
The climate control system uses cooling
and heating to help maintain a pleasant
environment inside the vehicle.
System operation
Ventilation
Set the mode to the
position.
Set the air intake control to the outside
(fresh) air position.
Set the temperature control to the
desired pos
Closing the liftgate
To close the liftgate, lower and push
down the liftgate firmly. Make sure
that the liftgate is securely latched.
WARNING
Make sure your hands, feet and other
parts of your body are safely out of the
way before closing the liftgate.
WARNING
Exhaust fumes
The liftgate lid should be
Content
- Home
- Kia Sportage - Fifth generation (NQ5) - (2022-2026) - Owner's Manual
- Kia Sportage - Second generation (JEKM) (2005-2015) - Body Workshop Manual
- Kia Sportage Third generation (SL) - (2011-2016) - Service and Repair Manual
- Sitemap
- Top articles
