Kia Sportage: Camshaft
Repair procedures
Removal
Timing chain cover removal is not required for this procedure.
CAUTION
- Use fender covers to avoid damaging painted surfaces.
- To avoid damaging the cylinder head, wait until the engine coolant temperature drops below normal temperature before removing it.
- To avoid damage, unplug the wiring connectors carefully while holding the connector portion.
NOTE
- Mark all wiring and hoses to avoid misconnection.
- Turn the crankshaft pulley so that the No.1 piston is at top dead center.
WARNING
In case of removing the high pressure fuel pump, high pressure fuel pipe, delivery pipe, and injector, there may be injury caused by leakage of the high pressure fuel. So don't do any repair work right after engine stops.
1. Remove the cylinder head cover. (Refer to Timing system in this group)
2. Set No. 1 cylinder to TDC/compression.
- Turn the crankshaft pulley and align its groove with the timing mark "T" of the lower timing chain cover.
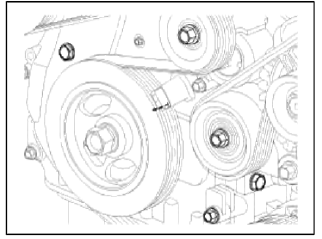
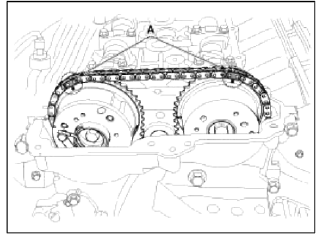
- Check that the TDC marks (A) of the CVVT sprockets are in straight line on the cylinder head surface as shown in the illustration. If not, turn the crankshaft one revolution (360º).
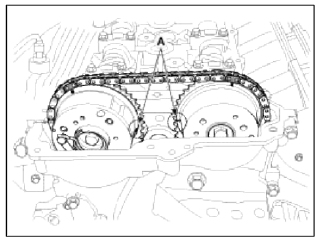
3. Mark the timing chains (A) corresponding to the timing marks of the CVVT sprockets.
4. Turn the crankshaft pulley 15º clockwise.
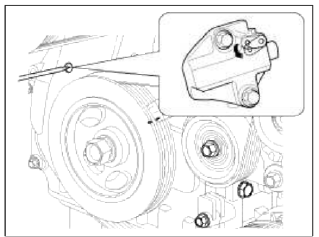
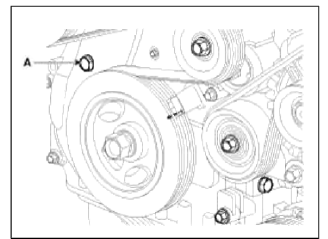
5. Remove the service hole bolt (A) of the timing chain cover.

CAUTION
The bolt must not be reused once it has been assembled.
6. Remove the intake and exhaust camshaft bearing caps.
7. Release the ratchet of the timing chain tensioner by pulling the link down using a thin rod.
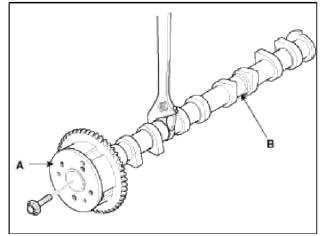
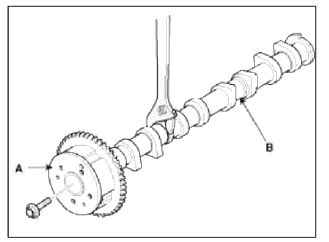
8. After loosening the timing chain, remove the exhaust CVVT & camshaft assembly (A) and then the intake CVVT & camshaft assembly (B).

CAUTION
When taking off the timing chain from the CVVT sprockets, hold the timing chain.
9. Tie down timing chain so that it doesn't move.
CAUTION
Be careful not to drop anything inside timing drain cover.
Installation
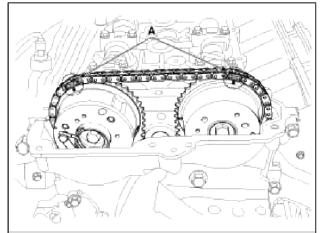
1. Hold the timing chain, and place the intake CVVT & camshaft assembly.
2. Place the exhaust CVVT & camshaft assembly after releasing the ratchet of the timing chain tensioner.
NOTE
The timing marks of each CVVT sprocket should be matched with timing marks (painted link) of timing chain when installing the timing chin.
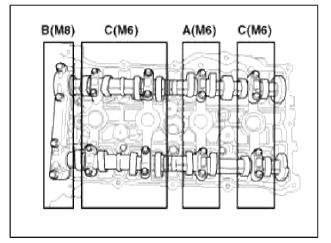
3. Install the camshaft bearing caps in their proper locations.
Tightening order
Group A → Group В → Group C
Tightening torque
Step 1
M6 : 5.9N.m (0.6kgf.m, 4.3lb-ft)
M8 : 14.7N.m (1.5kgf.m, 10.8lb-ft)
Step 2
M6 : 10.8 ~ 12.7N.m (1.1 ~ 1.3kgf.m, 8.0 ~ 9.4lb-ft)
M8 : 27.5 ~ 31.4N.m (2.8 ~ 3.2kgf.m, 20.3 ~ 23.1lb-ft)
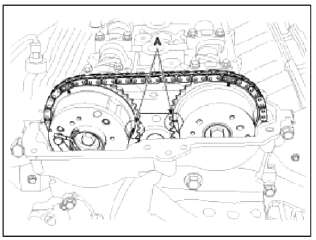
4. Install the service hole bolt (A).
Tightening torque: 11.8 ~ 14.7N.m (1.2 ~ 1.5kgf.m, 8.7 ~ 10.8lb-ft)
5. Тurn the crankshaft two turns in the operating direction (clockwise), and then check that the TDC marks (A) of the CVVT sprockets are in straight line on the cylinder head surface.
6. Install the cylinder head cover. (Refer to Timing system in this group)
Disassembly
1. Disassemble the CVVT assembly (A) and camshaft (B).
NOTE
When removing the CVVT assembly bolt, prevent the camshaft from rotating by using a wrench.
Reassembly
1. Reassemble the CVVT assembly (A) and camshaft (B).
Tightening torque: 53.9 ~ 63.7N.m (5.5 ~ 6.5kgf.m, 39.7 ~ 47.0lb-ft)
NOTE
When installing the CVVT assembly bolt, prevent the camshaft from rotating by using a wrench.
READ NEXT:
 Cylinder Head | Removal - Repair procedures - Cylinder Head
Components and Components Location
Components
Camshaft bearing cap
Camshaft front bearing cap
Exhaust camshaft
Intake camshaft
Exhaust CVVT assembly
Intake CVV
Inspection - Repair procedures - Cylinder Head
Inspection
Cylinder Head
1. Inspect for flatness.
Using a precision straight edge and feeler gauge, measure the surface the
contacting the cylinder block and the
manifolds for warpage.
Flatne
SEE MORE:
Components and Components Location | Front Strut Assembly
Components Location
Front axle
Front lower arm
Drive shaft
Stabilizer bar
Steering gearbox
Sub frame
Front strut assembly
Front Strut Assembly
Components and Components Location
Components
Strut assembly
Insulator
Bearing
Indicator lights
Electronic stability control (ESC)
indicator light
This indicator light appears:
Once you set the ignition switch or
ENGINE START/STOP Button to the
ON position.
It appears for approximately 3 seconds
and then goes off.
When there is a malfunction with the
ESC system.
In
Content
- Home
- Kia Sportage - Fifth generation (NQ5) - (2022-2026) - Owner's Manual
- Kia Sportage - Second generation (JEKM) (2005-2015) - Body Workshop Manual
- Kia Sportage Third generation (SL) - (2011-2016) - Service and Repair Manual
- Sitemap
- Top articles
